Sunday 28 February 2010

KOULOURAKIA for EASTER; A Greek butter cookie


Ah, spring and the impending arrival of Easter ... Time to make koulourakia!!!


Here is my second recipe for koulourakia. Although I make version #1 anytime, the version here is the one I favour at Easter. It makes a larger quantity, and I find the flavours better suited to accompany tsoureki and all the other delicacies that abound during the Greek Easter celebrations. The dough is crunchy on the outside with a soft, crumbly interior, and the flavour is buttery. The addition of orange flavour is not overwhelming; one just gets a hint of the taste of orange. If you prefer a cookie with a more pronounced butter flavour, leave out the orange. This recipe makes approximately eighty cookies.


Ingredients:

250 grams/9 ounces unsalted butter, allowed to soften
2 cups caster* (superfine) sugar
5 eggs, separated 
1 egg yolk
1 and 1/2 teaspoons vanilla extract
1/2 teaspoon orange extract
rind from one orange
1 cup lukewarm milk
1kilo all-purpose flour (8 cups)
1 teaspoon baking soda
1/2 teaspoon cornstarch
3 teaspoons baking powder 
Egg wash: beat two eggs with one tablespoon of milk. 
Sesame seeds for topping, but that's optional.


No sesame seeds here, but koulourakia with this round shape would look particularly good with some sesame seeds scattered on top of them. 


*CASTER SUGAR

Not necessary to purchase it; it can be prepared at home! 

The advantage of using caster sugar is that it dissolves quickly and easily, a feature one wants in cookie recipes. Caster (or superfine) sugar is granulated sugar that has been ground enough to take on a superfine quality. This is easily achieved by processing granulated sugar for about one minute or two, inside a blender or food processor. One or two minutes will suffice. If processed for a longer period it will reach the consistency of powdered (confectioner's) sugar. 

Grind more than the amount called for in a recipe because some granules will turn into sugar dust. Cover the processor lid so as not to have sugar dust escape onto your working area. 


Directions:

  • During whisking, periodically turn off the mixer so as to scrape down the sides of the bowl; make sure all the batter is well incorporated. 
  • Combine the baking powder, cornstarch and baking soda with one cup of the flour. Set aside.
  • Into a very clean bowl of your stand mixer, using the whisk attachment, beat the egg whites until stiff peaks form. Remove them from the bowl and reserve. Make sure there's no egg yolk, butter, or any other form of fat which comes into contact with the egg whites as they are being whisked. The presence of fat will not allow egg whites to reach the meringue/stiff peak stage. 
  • Clean the bowl of your mixer at this point, it's okay to wipe it off with a paper towel. 
  • Add the butter and whisk until smooth.
  • Add the caster sugar and beat until the butter and sugar appear light and fluffy. 
  • Continue to beat, adding the egg yolks one at a time. 
  • Add the vanilla, orange extract and orange rind. 
  • Add the milk and mix. Turn off the mixer. 
  • Fold in the reserved egg whites.
  • During whisking, periodically turn off the mixer so as to scrape down the sides of the bowl; make sure all the batter is well incorporated. 
  • Change to the dough hook. Add the reserved one cup flour/baking powder mixture into the butter/sugar mixture. 
  • Slowly add the rest of the flour. The mixture is ready when a dough has formed that doesn't stick to the sides of the bowl. 

  • Preheat the oven to 350F/180C. Have a seat and start shaping the cookies: take pieces of the dough and form them into spheres of about 3/4 of an inch in diameter. 
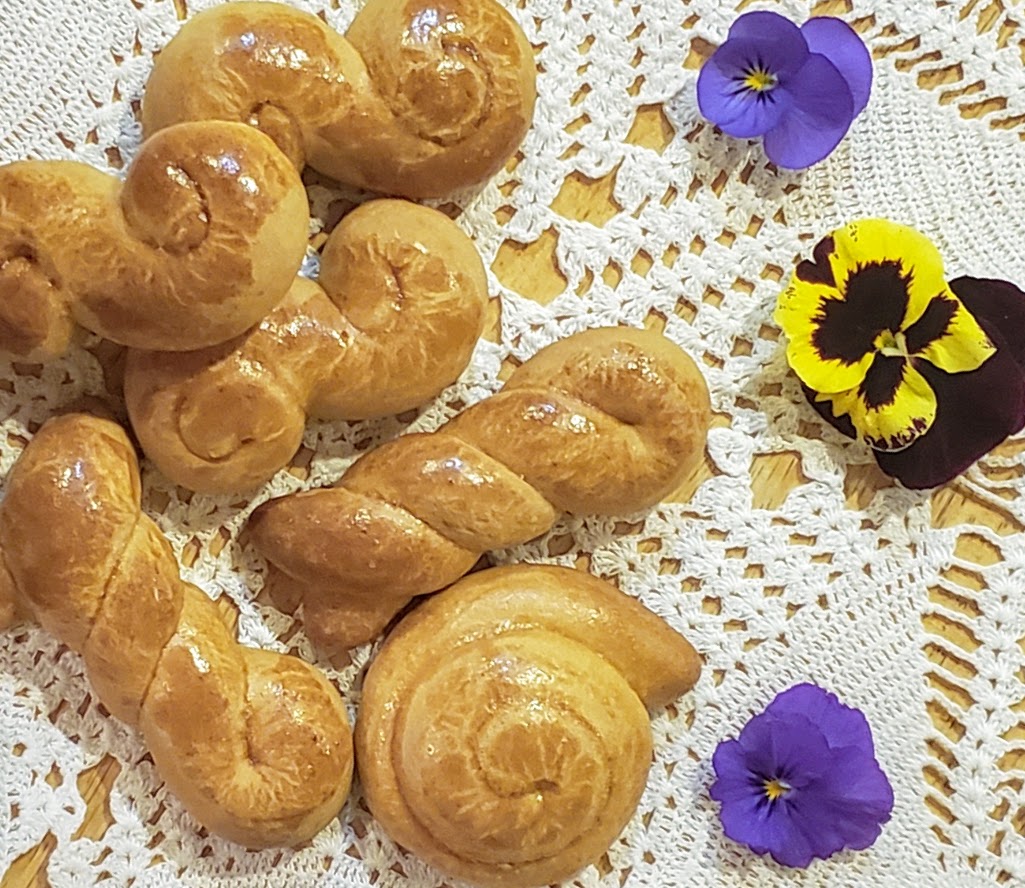
  • When finished forming the spheres, roll each into a rod shape and fold it in half, then twist the two halves together. This is the most popular shape, but there are others you can make: for example, you can form an S and then roll in the ends. as you see in the picture below. Or make little circles or shells.

An overview of different shapes

This spiral is the most popular shape. 

A serpentine shape
Another nice shape. This will look particularly nice if topped with sesame seeds!

  • Place the cookies on parchment covered cookie sheets and brush them with egg wash. This is the point where you decide if sesame seeds will decorate your cookies this year. If you lean towards the affirmative, sprinkle the seeds with a light touch. Don't overcoat the cookie with them. 
  • Bake for about 25 minutes give or take, rotating the pans halfway through baking. The cookies should come out of the oven lightly golden, not too brown.
  • Take them out of the oven and allow them to cool slightly. Remove them from the cookie sheets carefully, as koulourakia can be fragile. Stack them in layers inside cookie tins.


  • Koulourakia will keep for up to two months unless you have little mice in your house. I am referring to the two-legged variety of little mice that can open tins and take out handfuls of koulourakia to enjoy with a glass of milk. If you have those little mice, don't count on these cookies lasting as long as two months.
I make these cookies once yearly, at Easter time. Usually, I'll take a photo of them to show friends ... If the photo is enough to my liking, I'll post it here. I've reached the point where I have way too many pictures of these cookies. I should stop photographing them, is what I should do. However, as far as koulourakia go, this is an excellent recipe and so I like to show it off! 

Friday 26 February 2010

ONE KOURABIES TWO KOURABIEDES, and lots of PECANS!


Kourabiedes are Greek cookies made with butter and almonds, then sprinkled with powdered sugar. They are served at weddings and holidays and on any other occasion you want. Any time is a good time for a kourabies (grammatically speaking, kourabies is the singular form of the noun, and kourabiedes is the plural). Deviating a bit from tradition, I present you with a version of kourabiedes made with pecans. Pecans are native to south and central North America, therefore they are not used in traditional Greek cooking. However, good cooks like to experiment, and so I imagine the recipe for pecan kourabiedes was created by Greek immigrants living somewhere in the Southern USA. The recipe was given to me by my mother, who discovered it during one of her annual winter trips to Florida. Wherever my mother goes, you can bet there are recipe swaps happening. One day recently, mom and I made these together. Here is the recipe:


Ingredients:

1 lb unsalted butter, left to soften at room temperature; make sure to get the best butter available. A good kourabies cookie depends on really good butter.
1/2 cup confectioner's sugar (powdered sugar)
1 teaspoon vanilla extract
4 cups all-purpose flour 
3 cups chopped pecans, toasted in the oven. Do keep an eye on them so that they don't burn. 
1 1/2 teaspoons baking powder

1/4 cup Cointreau
more confectioner's powdered sugar, about two cups


Directions:
  • Preheat the oven to 350°F/180°C.
  • Shift the flour with the baking powder. This is an important step, so please don't skip it.
  • In your processor and using the paddle attachment, beat the butter. The success of the kourabiedes depends on butter that is well beaten and fluffy. So keep beating and stop around the ten-minute mark.
  • Add the sugar and continue beating for a long time. About three weeks.
  • Add the vanilla extract, and keep beating for maybe another three weeks. Six weeks later... what you're looking for is sugar and butter with the consistency of whipped cream. If you don't have three to six weeks at your disposal ... I recommend beating for a total of 20 minutes.
  • Change to the dough hook and gradually add the flour mixture, mixing for two to three minutes until a soft dough is formed. After the flour is added it's important not to overbeat your mixture.
  • Add the pecans, and beat for another minute.
  • Form into small round balls and place on baking sheets.
  • Bake for about 15 to 20 minutes, until pale golden. Let cool for twenty minutes. Allowing the cookies to cool really well before proceeding is an important step of the recipe: if there is still steam escaping from them, the powdered sugar they are dipped into will hydrate and clump. 
  • Place the Cointreau in a small spray bottle and lightly spray the liqueur onto the cookies. You can use any type of spirit you like. Myself, I prefer the orange flavour of Cointreau. 
  • Spread 1 cup of the confectioners’ sugar on a large plate. Roll each cookie in the sugar, and place on a rack. Do this with all the cookies, adding more sugar to the plate as necessary. 
  • Sift additional sugar on top of the cookies and let rest for 3 to 4 hours. Carefully pack the cookies in cookie boxes, spreading a piece of waxed paper between each layer. They should keep for about one month.


Monday 22 February 2010

TARAMOSALATA with POTATOES


Sometimes taramosalata is made with potatoes. They replace bread, which is the more common ingredient used to dilute tarama. I don't know if this is a regional preference or just a recipe variation. Since tarama is often eaten during Lent, when there are many fasting restrictions, potatoes might have been added to make a more filling salad.

I have a particular fondness for this recipe, and it's slowly becoming my go-to recipe for tarama salad. It's lemony, with a mild tarama flavour, but if you like it stronger, you can add a little more tarama. The taste of the potatoes adds more complexity to the salad than bread does. 

Tarama made with potatoes reminds me of the following story, which my mother loves to tell: When my parents were newly married, my mother made taramosalata with potatoes instead of bread. It was around Easter time, and relatives were coming for dinner. When my father tasted it, he hit the roof. "What have you done? he asked her. Why did you put potatoes in the tarama? They'll be laughing at us!" He had never heard of a version of the recipe made with potatoes and he was very upset. His antics ruined my mother's confidence in the quality of the dinner she had prepared. Neither one of my parents was happy to see the company arrive. As it turned out the taramosalata was eaten with pleasure, and the guests complimented her cooking! I don't know what exactly if anything that incident taught my father; he was a man with a hot temper but I don't remember him criticizing my mother's cooking.

This tarama is based on a recipe I came across years ago when it was published in the New York Times.  

Ingredients:
  • 2 cups vegetable oil
  • 1/4 of an onion, chopped
  • 1 pound Yukon Gold potatoes, boiled, peeled, cooled and chopped
  • 3/4 cup blanched almonds, ground up
  • 1/2 cup (4 ounces) tarama
  • 2/3 cup lemon juice
  • 1/4 cup extra-virgin olive oil

Directions:
  • In a food processor mix the onion, potatoes and almonds until they are finely incorporated and the mixture looks smooth.
  • Add the tarama and keep mixing until blended.
  • Add the lemon juice, and mix.
  • Add the olive oil in a slow, steady stream mixing constantly. Stop when the salad has the consistency of mayonnaise 
  • Refrigerate for at least one hour before serving.
  • This should make about four cups, plenty for leftovers or to send home with guests.
What is Tarama?

What we purchase as bottled tarama is the salted and cured roe (or caviar) of carp fish. What is roe? That’s the ripe ovary and the masses of fish eggs it contains. Carp roe (or hard roe), is aged for about a year before it’s ready to be sold as tarama. Tarama is not eatable plain and should be turned into taramosalata before eating. Taramosalata is made by adding bread, lemon juice and oil to a portion of tarama. The mixture should have a light orange or salmon colour. The more it is diluted with bread and oil (or potatoes as is the case in the recipe here), the lighter its colour becomes. 


I truly would not recommend buying ready-made tarama salad (taramosalata); it contains chemicals and food colouring and who knows what else! If you find it ready-made for sale and it looks a hot pink colour, put your sunglasses on and run! 

Tuesday 16 February 2010

MUSSELS WITH RICE (for Clean Monday)


If it's mussels and rice for dinner, it must be Clean Monday. Why? Because Lent is here! For Greeks, the first day of Great Lent is called Clean Monday. It's a day of fasting after a long weekend of celebrating Carnival. Clean Monday begins the forty days of fasting and repentance that lead to Easter Sunday. In Greece, it's a public holiday. Clean Monday is a day of personal reflection and a day of forgiveness and cleansing of one's conscience. It ushers in "Clean Week," when it's customary to go to confession and clean the house, sort of a spring cleaning of the soul and its surroundings. Since Clean Monday is a holiday, people plan outdoor excursions. Paper kites are flown as a way of celebrating the coming of spring.
 
These two pages are from my precious first-grade reader. Here, a little boy name Riga is flying his kite which as he says went as high as the clouds, higher than any of the others. Then Riga gets a congratulatory hug from his yiayia (his granny). The cat, whose name is Snow, wants some hugs as well. This reader, long out of use scholastically, was reissued sometime around the year 2000, as a memento for all of us grown-up kids who were suffering from nostalgia. And believe me, that's what the skies looked like at the beginning of Lent during our childhood! They were filled with kites, and on the streets, little children and their parents, kites in hand, were walking towards open areas to let the kites go, go, fly up high! Then, home for a lenten meal with lagana, hortatarama, olives, and most likely mussels and rice. 


On Clean Monday, food is of the fasting type. Meat, dairy products, and eggs are forbidden. Alcohol is forbidden. Any type of fish with bones is not allowed to be eaten because bony fish contain blood. Shellfish are consumed, as well as a type of unleavened flatbread called a lagana. I say unleavened, that's the traditional rendition, however, modern times have ushered in the use of a small amount of yeast. 

A popular dish to have for dinner on Clean Monday is mussels and rice. And it's really delicious: Mussels and a seafood broth are incorporated into the making of rice pilaf. Yum! 

A note on my personal choice when buying mussels: 

There are two alternatives. One is to buy the live, farm-raised mussels, clean them (rinse, scrub, rinse, scrub, rinse, rinse), and cook them, hoping that you don't have too much waste. When buying fresh mussels, always buy more than you think you will need. Some will be open and must be discarded. Others will not open during cooking. Discard. Others will be so small that you will need a magnifying glass to find the mussel meat. Once fresh mussels are cooked, you'll have to remove the meat from the shells, discard a small mountain of shells, and scrub down kitchen counters, range counters, kitchen sinks, and kitchen floors ... If you're fine with that, then go ahead, purchase the fresh mussels.

For convenience at home, sometimes I choose the mussel meat that is available in the frozen seafood section of the market. Forgive me world, I buy frozen mussels, and I admit it. Okay? Okay. 

farmed mussels steaming in a pot
Well ... I buy fresh mussels as well. Here, they are steaming in a Dutch oven along with some aromatics. They should be covered while steaming. I removed the lid only to take the photo. Fresh or frozen, mussels come from the same source. 


Another note I want to post is to explain that buying farm-raised fresh mussels is preferable to buying the wild variety. Wild mussels will come filled with sand and grit. They will need lots of cleaning and water changes before they are ready to cook. Farmed mussels are grown on ropes that are attached to poles drilled into the ocean floor. This method of growing mussels is safe and beneficial for the environment; also, since these mussels don't get close to any sand, they are considerably cleaner than the wild ones. Mussels are filter feeders, and as they grow on their ropes, they feast on a natural diet of algae, not on that artificial diet of pellets given to other farm-raised seafood. Here are some pictures of mussel culture:

 sustainable aquaculture; a diagram of how mussels are farmed.

The mussel culture ropes are seen in the background; they make an important habitat for fish. 


Below, is my "mussel pilaf" recipe for Clean Monday. 


If you choose to use fresh mussels, count on purchasing four pounds of shell-on mussels. Wash your fresh mussels very, very well, pull out any beards present, discard any opened mussels, and cook the rest for five to six minutes in boiling water to cover. To this water, along with the mussels, add some aromatics: a cut-up lemon, a cut-up lime, an onion, some garlic cloves, some peppercorns, and some bay leaves. Once the mussels are cooked, drain, discarding the cooking liquid. Also, discard any unopened mussels, remove the mussel meat from the rest of the shells and proceed with the recipe. You may want to save some mussel shells for decoration.

Ingredients: 

The mussel meat that has been cooked. It will most likely wind up being somewhere around 16 ounces / 500 grams of mussel meat  
6 tablespoons of olive oil
1 large onion, chopped 
3 cloves garlic, chopped
1 sweet Italian frying pepper, chopped
3 scallions, sliced thinly, use the white and light green parts only
2 cups long-grain rice
3 tablespoons chopped parsley
2 tablespoons chopped dill
salt and pepper to taste
a sprig of thyme
the juice of one lemon
one tomato, skin removed, tomato cut into small pieces
Sliced lemons 
vegetable broth, clam juice, and water, any combination that's preferred. The liquid should equal 4 cups 


Directions:


For the rice and the assembly:
  1. In a Duch oven, heat 3 tablespoons of olive oil. Add the onions and sweet pepper. Sauté until the onions are translucent. Add the garlic and sauté for one minute.
  2. Add the rice and cook, stirring, for about two minutes. Season with a little salt and pepper.
  3. Pour the four cups of liquid and the rest of the oil (3 tablespoons) over the rice. Add the tomato, thyme, and lemon juice. 
  4. Simmer for 20 minutes until the rice is soft and the liquid has been absorbed.
  5. About five minutes before the rice is done, add the parsley, dill, and scallions. Correct the seasonings if needed. Mix well, cover, and continue cooking until done.
  6. Remove the thyme sprig then carefully fold the mussels into the rice. 
  7. Turn off the heat. Cover the pan with two paper towels and place the lid on top of the towels. Leave the pan on the stove (with the heat off) for 5 to 10 minutes. This will make the rice fluffier because the paper will absorb steam. Discard the paper towels and serve the pilaf. Offer lemon slices, as some people might want to squeeze more lemon juice onto their mussels.


TARAMOSALATA DIP or TARAMA SALAD


Here is recipe #2 for tarama. It comes courtesy of my mother's friend Litsa, who makes it often when she entertains. The recipe here is diluted with a larger quantity of oil and bread; this gives it a subtler flavour and makes it ideal to serve as a dip. It can be accompanied by crackers, pita slices, or sliced vegetables such as celery and cucumbers. Taramosalata can be served anytime, but it's a favourite recipe to have during Lent.


Ingredients:
  1. 3 tablespoons tarama
  2. 2 cups vegetable oil (not olive oil)
  3. 10 slices white bread, crusts removed
  4. 1/4 cup lemon juice

    Directions:
  • Immerse the bread in a bowl of cold water. When it is soaked, remove it and squeeze the bread thoroughly to get rid of excess water.
  • Place the tarama in the bowl of a food processor. Add the oil and start to blend. Continue blending until the tarama and oil are well mixed.
  • Add the bread, a bit at a time, while blending all the while. You will see that the tarama will begin to thicken.
  • Keep blending while adding the lemon juice. All the ingredients should be well incorporated. The tarama will be ready when it has the consistency of thick mayonnaise.


PRASORIZO (Leeks with Rice)


7th

The noble leek, a cousin to the lowbrow onion and to the even more common garlic, is native to the Middle East. Its cultivation and consumption spread to Europe courtesy of the Romans. It must have been the Romans who introduced the leek to the Welsh, and the rest was history. The leek became the national emblem of Wales. Could there ever be a greater honour for a vegetable? Consider that Saint David, the patron saint of Wales, was an inveterate eater of leeks! Do not laugh dear reader. Instead, eat some leeks. For as Shakespeare wrote in Henry V, "if you can mock a leek, you can eat a leek...it is good for your green wound and your ploody coxcomb."*

Pitifully, the Greeks, of which I am one, have not honoured the leek to the extent that the Welsh have. However, Greeks have found delightful ways with which to cook leeks. Leeks are plentiful in winter. They are tolerant of cold weather and can be harvested even when temperatures drop to 0° C. 

Usually, I visit Greece in late summer and stay through October. And it's in October when leeks appear at the vegetable stands: bundles of leeks, stacked high in long rows,  fragrant, bright green and creamy white, each day's supply sells out by noontime. The autumn and winter months find us Greeks using leeks in lots of recipes. One of the simplest to make is prasorizo, which means leeks and rice. Believe me, it's delicious!


Ingredients:
  • 3 lbs leeks
  • 1/2 cup olive oil
  • 1 red onion, chopped
  • 2 cloves garlic, chopped
  • 1 cup vegetable broth
  • 1/2 cup rice
  • 3 celery stalks, chopped
  • 2 tablespoons finely chopped fresh parsley
  • 3 tablespoons finely chopped fresh dill
  • juice of half a lemon
  • salt and pepper to taste
Directions:

Clean and prepare the leeks for cooking: cut off the root end and discard the rough green leaves. Save the white and light green part of the leek. Cut it in half lengthwise and rinse each half several times under cold running water. This method ensures that the soil and sand that has remained between the leaves are washed off. Drain and cut the leeks into one-inch pieces.

In a heavy pot heat the olive oil and saute the onion, celery and garlic. Cook about five minutes, stirring, until the onions are translucent.


Add the leeks and stir well, saute for about two minutes, add the broth and season with salt and pepper. Bring to a boil, lower the heat and simmer for 35 minutes. The leeks should be covered with liquid during cooking. If necessary add more broth, or add water if you prefer. After about 35 minutes, stir in the rice, parsley, dill, and lemon juice.

Cook for about 30 minutes more, until the rice is done and the liquid has been absorbed. Remove from the heat, taste, and season with salt and pepper as needed. Serve while still hot, and offer lemon wedges for those who wish to use more lemon juice. Better yet, you can garnish each plate of prasorizo with lemon slices.

*Note: "good for your... ploody coxcomb," meaning: ploody = mispronunciation of bloody, and coxcomb = a type of hat: therefore, "good for your... bloody hat," referring to the Welsh custom of pinning a leek on hats to celebrate St. David's Day.

Friday 12 February 2010

TARAMA SALAD (Taramosalata)


I was young and just learning the ropes around the kitchen. A holiday was approaching, and we were to have a big gathering for dinner. I wanted to have something special to accompany our meal, so I decided to make a taramosalata, my first effort at making the famous Greek appetizer. This was many, many years ago, when Greek cookbooks were difficult to find at the bookstore, and when the Internet had not yet been born. Can you imagine such a time? Anyway, I knew that Craig Claiborne had a recipe for tarama in his tome "The New York Times Cook Book." I followed his recipe, and the results were wonderful. To my mind, this was and is the quintessential recipe for tarama! It's tangy, the olive oil gives it a great aroma, and the taste is as close to perfect as you can get. It reminds me of the tarama we order during Greek summer vacations when we descend ravenous at seaside Greek tavernas after a day of sun and sand and swimming. Here is Craig's recipe, with only one alteration by me: I added extra lemon juice.

Ingredients:
  • 3 tablespoons bottled tarama (carp roe)
  • 4 tablespoons lemon juice
  • 3 slices white bread, crusts trimmed
  • ¾ cup extra virgin olive oil 
  • ¼ of an onion, finely grated
  • 2 scallions, mostly white parts, well chopped 
Directions:

  • Place the tarama and the lemon juice in the food processor and blend until thoroughly mixed.
  • Meanwhile, soak the bread slices in cold water, not for very long, about half a minute. Remove them and squeeze the bread thoroughly.
  • Add the bread to the mixture. Mix until thoroughly blended.
  • Add the oil gradually. Keep blending until all the oil is incorporated and the mixture has the consistency of thick mayonnaise. 
  • Stir in the grated onion and scallions.
  • Place on a serving dish and decorate with Kalamata olives and a few Salonika peppers (these peppers are very similar to pepperoncini). A nice accompaniment would be some sliced tomatoes or cucumbers.  Serve as an appetizer with toast or pita bread.

Bottled tarama purchased at the supermarket

What we purchase as bottled tarama is the salted and cured roe of carp fish. What is roe? That’s the ripe ovary which contains masses of fish eggs. Carp roe (or hard roe), is aged for about a year before it’s ready to be sold as tarama. Tarama is not eatable plain and should be turned into taramosalata before eating. Taramosalata is made by adding bread, lemon juice and oil to a portion of tarama. The mixture should have a light orange colour. The more it is diluted with bread and oil, the lighter its colour becomes.

Wednesday 10 February 2010

SPANAKOPITA


Spanakopita is a savoury pie, well known to Greeks and non-Greeks alike. It's made with spinach, scallions, aromatic parsley and dill, and a generous amount of the ubiquitous feta cheese. These ingredients are mixed together and are spread between layers of phyllo dough. The spanakopita is then baked, and it can be eaten hot or cold. Store it in the refrigerator for one or two days, three if you must, but keep in mind that phyllo tends to get soggy, therefore, its storage life should be short. In most homes, this happens by default, since no one can resist sneaking to the fridge for one more piece of spanakopita.
Before we go ahead with the recipe, some words about phyllo dough. Phyllo (фύλλο), means leaf in Greek. That describes this dough perfectly: it's made up of several fragile sheets packaged together and resembling thin, transparent leaves.
  • There are two types of phyllo: store-bought and homemade.
  • The homemade type is not difficult to make. If one can bake bread, one can become accomplished at making phyllo. It takes a bit of practice and a bit of patience, but the result is worth it. Homemade has a better flavour than store bought, and it has a denser, thicker texture, which is more desirable for savoury pies.
  • The commercial variety is also very good, and very, very convenient, thus widely used. It is sold in one pound packages and is available in different thicknesses.
  • Phyllo sheets measure 18" x 14" but can be cut with kitchen shears as required to fit the recipe or pan. Phyllo can be bought fresh or frozen. Either variety is good, but make sure that you check its expiration date.
  • The thin variety of phyllo, usually labelled #4, is meant to be used for pastries such as baklava. Each 1 pound box contains approximately 24 sheets.
  • The thicker variety sometimes referred to as "country phyllo" contains about eight sheets per 1 pound box, and is more suited for savoury cheese and vegetable-filled pies.
  • If you're going to make baklava, use the #4 phyllo. If you're making spanakopita, do yourself a favour and look for the thicker variety. If your supermarket does not carry thick phyllo, visit a Greek or Middle Eastern market. There will be plenty of it there. (If in a pinch, the thinner variety can be used. Layer 8 sheets on the bottom, 4 in the middle, six on top, and don't forget to brush each sheet with oil).
  • As you are working with phyllo, keep it covered with a clean kitchen towel to keep it moist. It dries out very quickly and then becomes brittle and difficult to use. Remove one sheet at a time keeping the remainder covered.
  • Do not worry if you tear a piece of phyllo by mistake. You can patch pieces by joining them together. Use them on the bottom or middle layer of your pastry or pie so that it will not show in the final product.
  • No matter what thickness or shape you are using, each piece of phyllo must be brushed with oil (or butter) as it is layered. This keeps the sheets separated, giving you a fluffy and airy end product. 
Ingredients:

2 (10-ounce) packages frozen chopped spinach, thawed and drained well. Make sure there is very little liquid remaining in the spinach.
1/4 cup of olive oil
3/4 cup finely chopped fresh dill
1 cup of finely chopped fresh parsley
1 red onion, chopped
5 scallions, chopped
1 leek, well rinsed and chopped (use the white and light green parts)
3 cloves garlic, chopped
3/4 pound of feta cheese
1/4 cup ricotta cheese
4 tablespoons Parmesan cheese, divided
3 tablespoons breadcrumbs
1 egg
1 teaspoon pepper
1 pound package of thick phyllo pastry sheets (# 10), defrosted as per package directions if purchased frozen.
1/2 cup oil, a combination of olive and another good vegetable oil to brush the pan and phyllo 
A pastry brush

Directions:
  • In a large pot, heat the oil over medium-high heat. When hot, sauté the leeks, onions, scallions, and garlic until they soften, stirring continuously with a wooden spoon. 
  • Add the spinach, stir and cook about five minutes,  stirring occasionally.
  • Transfer to a colander and set aside to drain for at least one hour.
  • Meanwhile, bring the packaged phyllo dough to room temperature.
  • Remove the spinach mixture from the colander and place in a bowl.
  • Beat the egg with a fork and add to the spinach mixture. Toss well to combine.
  • Add the dill, parsley, and pepper. Stir to combine.
  • Using a fork break the feta into chunky pieces. 
  • Add to the spinach mixture. 
  • Add the ricotta cheese and two tablespoons of the Parmesan cheese. Toss to combine. 
  • Preheat the oven to 350°F/180°C. 
  • Brush the bottom and sides of a deep baking pan with oil (the pan can be round, square, or rectangular).
  • Layer 3 of the phyllo sheets on the bottom, brushing each sheet with the olive oil.
  • Spoon half the spinach mixture on top of the sheets and spread evenly. Sprinkle some of the breadcrumbs over the spinach. These will absorb any excess water.
  • Layer one phyllo leaf on top of the breadcrumbs. Brush it with oil and then sprinkle a bit of Parmesan cheese over it. Layer another phyllo leaf on top of that, and again brush with oil.
  • Spoon the rest of the spinach mixture on top, and spread evenly. Once again, sprinkle some bread crumbs over the spinach.
  • Layer the remaining phyllo sheets on top, brushing each sheet with oil. Overlapping phyllo can be trimmed with kitchen shears or folded in.
  • Brush the top of the spanakopita lightly and evenly with oil and sprinkle with a bit of Parmesan cheese.
  •  Score into serving-size squares, cutting through to the bottom. Sprinkling the top with cheese is optional, but you must brush with oil!
  • Bake in the centre of the oven for about 45 minutes or until golden brown. When done, remove from the oven and allow to cool 20 minutes before serving.
  • For Greek pitas don't use butter. Save your butter for the baklava. For the spinach pies, cheese pies, or any other savoury pie, oil is the way to go! ou'll get a lighter, tastier, healthier product.