Wednesday, 30 December 2009

LINUS


This is Linus. A five and a half year old bichon frise who is very active and very affectionate. He also has a very healthy appetite. So it is fitting that there should be a post about him here, in a food related blog. He has watched me cook every recipe I've posted. He has even sampled some of them. Linus was kind enough to pose for the camera on Christmas day, 2009. With him was his very close and very best friend, Bastille. Linus hopes that everyone had a lovely Christmas, and he wishes a Happy New Year to all! Bastille concurs!


Bastille knows there's snow outside. On such days, she considers lounging by the fireplace a splendid passtime! This year we had a white Christmas. December snows are rare here in Philadelphia. We enjoyed the fire 'til the last few embers changed into ashes.

Bastille was feeling under the weather. The vet prescribed antibiotics, and she napped a lot. Bastille, get well soon! We love you very much!


Happy 2010 everyone!


Wednesday, 23 December 2009

HOLIDAY GREEN BEAN CASSEROLE WITH HOMEMADE CREAM SAUCE.


Green Bean Casserole is one of the most popular side dishes to grace people's tables, particularly during the holidays. In fact, it's a holiday standard. And it's comfort food. The original recipe was invented during the days when canned and processed foods were stars of the kitchen because they were, as advertised by the manufacturers, good tasting and convenient. One usually finds recipes for Green Bean Casserole that call for canned cream of mushroom soup and canned green beans. Alternately, some folks use fresh green beans in combination with canned soup. Yes, it's quick and easy, but just think how much better a green bean casserole will taste if made with homemade sauce! And there's definitely a trend out there of taking the original recipe and augmenting it with fresher, homemade ingredients. 

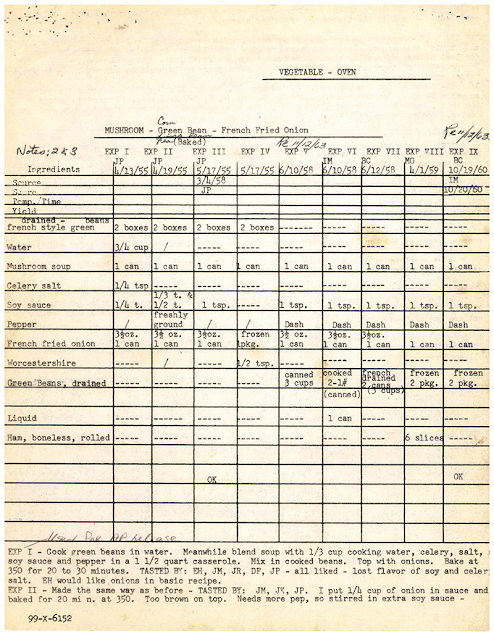
Look below at this add! Memories ... I wish I had a dollar (or five dollars, why not?) for each time I had opened a magazine to find the recipe in the picture below:

This is definitely a trip down memory lane. Such recipes announced the coming of the holidays!!! 

The original recipe has an unbelievably high sodium content. And does canned mushroom soup really taste as good as a homemade sauce? Perhaps the answer is subjective. Comfort food is comfort food for a reason, and people don't like their comfort food to be messed with. As for me, I tried making everything from scratch and I never looked back. For one thing, I love a homemade roux! So I riffed off the original recipe.

Here we have a recipe that replaces the canned soup for a flavourful roux containing fresh mushrooms. The green beans are fresh and the topping is made from panko breadcrumbs. *Scroll all the way down to find out who invented Green Bean Casserole!

Ingredients:

2 pounds green beans, halved if you like, ends trimmed
olive oil at the ready
1 onion chopped
1 large shallot or two small ones, minced
2 tablespoons parsley, chopped
1 pound mushrooms, sliced
3 cloves garlic, minced
3 tablespoon fresh thyme leaves
3 tablespoons unsalted butter
3 1/2 tablespoons flour
Vegetable or chicken broth
3 cups of liquid: start with two cups heavy cream and add the liquid from the green beans. If you have less than three cups add some vegetable broth until you have the amount needed. 
1/4 cup grated Pecorino Romano cheese
salt and pepper to taste
panko topping: for ingredients, see below
Topping:
2 cups unseasoned Panko bread crumbs
2 tablespoons butter chopped in tiny pieces. This is easily done when the butter is cold. 
1 or 2 tablespoons olive oil
2 tablespoons grated Pecorino Romano cheese

  • Combine all ingredients and mix well.

Directions:

  • Braise the green beans: In a Dutch oven heat 2 tablespoons olive oil and add the chopped onion. Cook until the onion is translucent. 
  • Add the green beans, season with salt and pepper, and while stirring, cook for about three minutes. 
  • Add enough broth to cover the green beans and bring to a boil. Add the parsley and one tablespoon of the thyme. Lower the heat, cover the pot and let cool for about 45 minutes or until desired doneness is reached. 
  • Drain the green beans, reserving the cooking liquid if any is left. Set aside both green beans and cooking liquid. 
  • In a skillet, heat 2 tablespoons olive oil, lower the heat and add the shallot(s). Cook stirring for about two minutes. 
  • Add the mushrooms, garlic and thyme. Season with salt and pepper and while stirring occasionally, sauté for about five minutes until the mushrooms release their moisture and their liquid begins to evaporate. 
  • Add the butter and let melt. Add the flour and cook stirring the mixture for about one minute. Slowly add the three cups of liquid and bring to a boil stirring all the while until you have a thickened mixture.
  • Add the Pecorino Romano cheese.
  • Combine all the ingredients and arrange them in a baking dish, spreading them in an even layer.
  • Sprinkle with the topping and bake at 400° F for about 20 minutes, until the cream is bubbly and the topping is crispy.
  • This dish can be partially prepared one day ahead: cover the baking dish and refrigerate. The following day, bring the casserole to room temperature before baking. 
  • But wait!!! Who invented the Green Bean Casserole recipe??? Her hand-written recipe card is in the archives of the National Inventors Hall of Fame!


The inventor was Dorcas Reilly (1926-2018), born in New Jersey, resident of Haddonfield New Jersey, graduate of Philadelphia's Drexel University, and employee at the home economics department of Campbell's test kitchens in Camden, New Jersey. Reilly eventually became manager of Cambell's test kitchens. That's her in the photograph below (November 2002), at the National Inventor's Hall of Fame, when she donated her recipe card.

Mrs Dorcas Reilly being honoured at the Inventor's Hall of Fame (2002). She was a pioneer in her field, going to work in the 1950s and managing full-time employment along with marriage and motherhood. 
 
Dorcas Reilly created green bean casserole in 1955 for an Associated Press feature about easy to make holiday dishes. She used ingredients that Americans tended to have on hand in the 1950s, such as green beans and Campbell's Cream of Mushroom soup. Another famous recipe of hers is the tuna noodle casserole. Which I love made with a homemade roux and topped with potato chips, yum!!! 

Post War America liked inexpensive, fuss-free recipes. A large number of women were entering the workforce and therefore depended on recipes featuring quick, easy to make meals. Convenience cooking, which included canned and frozen foods, became all the rage. How do working women manage their kitchens these days? 

Monday, 21 December 2009

Escarole Soup, or Italian Wedding Soup


Mrs D was of Irish descent, a Canadian from StJohn's Newfoundland, but she had the reputation of making the best Italian home-cooked meals in the Philadelphia area. That's a lot to say considering that there is such a large Italian population in Philadelphia and its suburbs. Many will disagree and nominate someone else to take over Mrs D's spot. Although I can understand their objections, I will respectfully disagree. 

A home-cooked meal 
shared with good company and made by a person one holds dear makes for a time well spent. I am grateful to Mrs D and to her family for giving me so many wonderful memories! 

Mrs D, whose first name was Carmel, met Richard D, her Italian-American husband-to-be when, during the Korean War, he was stationed at an American air force base in Stephenville, Newfoundland. The two fell in love and were soon married. Carmel found herself ensconced in her new home in Philadelphia. It was West Philadelphia to be exact, St Donato's parish, Overbrook. 


Founded in January 1910, at 65th and Callowhill Sts Philadelphia, PA.


The Overbrook section of West Philadelphia was one of the neighbourhoods where a large population of Italian Americans called home. Some of them still live there, most (like Mrs D and her family), have moved away. Carmel became close with her in-laws, especially with Anne, her new aunt. Aunt Anne taught Carmel all about Italian cooking, and soon Carmel was on her way to becoming a superb Italian home cook.

Thanksgiving and Christmas meals at Mrs D's would always begin with escarole soup (otherwise known as Italian wedding soup). Escarole soup is basically chicken soup on steroids. It's chicken soup amplified to an eleven, and I hope you get the inference! To honour Mrs D, I have incorporated escarole soup into my own holiday traditions. Now, when my Greek-Spanish-Italian family gets together for the holidays, meals begin with escarole soup. 

We enjoy those succulent little meatballs swirling in aromatic chicken broth, and we reminisce and celebrate. Mrs D, Carmel, Carm, I remember you, I miss you, I love you! 


ESCAROLE SOUP

Step 1: Make the chicken broth.

You can use store-bought chicken broth, but we all know that to have a good soup base we must make our own broth, with chicken and soup vegetables. The store-bought broth is all right to use if you need to make something in a jiffy, but for a special occasion, do start from scratch. To lessen the labour involved, the broth can be made a day before, or even a month ahead and then frozen. Here's how:
  • Clean and wash one 5 lb chicken. Place it in a large soup pot. Add:
  • three carrots roughly chopped
  • three stalks of celery with leaves, roughly chopped
  • one large onion peeled and cut into quarters
  • one parsnip roughly chopped
  • one turnip cut in quarters
  • one leek roughly chopped
  • Add some dill and parsley, stems and all
  • Add two bay leaves 
  • Add ten peppercorns, three cloves of garlic cut up, and salt and pepper.
  • Pour water over the ingredients, filling the pot to about one inch from the rim. Place it on the stovetop and bring it to a boil. Turn the heat to low and cover. Allow the soup to cook slowly until the meat of the chicken can be easily pulled off the bone. Turn off the heat, and let cool.
  • When the meat is cool enough to handle, remove the chicken from the pot. Strain the broth and reserve it. Press down on the vegetables with a masher to remove their excess liquid and combine that liquid with the reserved broth. Discard the vegetables.
  • Remove the meat from the chicken bones and reserve some breast meat to be used when assembling the soup.
  • You can save the rest of the cooked chicken for another use. You now have the broth that will be used as a base for your soup. Refrigerate or freeze it until ready to use.
  • Tip: the fat in the broth rises to the top. While the broth is in the refrigerator, the fat will solidify. You can skim it off, and you will have a fat free broth.
Step 2: Prepare the escarole.
  • Escarole can be bitter. Therefore, cook it separately in water rather than in the broth. This way, the bitterness will leach out into the water which will then be discarded. The escarole can be cooked ahead of time and stored in the refrigerator. 
  • Clean one large or two small heads of escarole very carefully. You'll have to wash them several times to make sure no soil or sand remains stuck to the leaves.
  • Cut the escarole into pieces one to two inches in length.
  • Bring a pot of salted water to boil and add the escarole. Cook for about five minutes, until the escarole is wilted and has given off its liquid. Turn off the heat and drain the escarole
  • Immerse it in an ice water bath to blanch it. After about five minutes drain it and reserve it until ready to use.
Step 3: Make the meatballs.

  • 1 lb lean ground beef
  • 1/2 cup breadcrumbs 
  • 3 cloves garlic, minced
  • 3 tablespoons fresh parsley, minced
  • 1 tablespoon fresh basil, minced
  • 1/4 cup grated Pecorino Romano cheese
  • 1 egg beaten
  • 2 tablespoons milk
  • salt and pepper to taste
  • Combine all the ingredients and shape them into small meatballs, about one inch in diameter. 
  • Saute the meatballs in some vegetable oil until they are browned. Remove them onto paper towels. The meatballs will finish cooking in the broth.

Step 4: Assemble the soup
  • Bring the broth to a boil (you should have about ten cups).
  • Add one diced carrot and three chopped green onions.
  • Drop the meatballs into the boiling liquid, lower the heat and finish cooking them.
  • Cut up the reserved chicken breast into bite-sized pieces and add it to the broth.
  • Add the escarole.
  • Add three tablespoons of chopped parsley.
  • Ready to serve! Plate and pass around grated Pecorino Romano cheese to sprinkle on top.


Wednesday, 9 December 2009

CABBAGE AND RICE PILAF, FROM THRACE (LAHANORIZO)


Cabbage, the super vegetable! Cabbage is very low in calories - 35 calories for one cup. It's a good source of protein, vitamin C, vitamin A, potassium, calcium, and fibre. It contains nutrients with anti-cancer properties, something cabbage has in common with the other vegetables in the cruciferae family to which it belongs. "Cruciferous" plants are so named because they bear four-petaled flowers, thus having blooms reminiscent of a crucifix. Some of the other vegetables in this family include broccoli, cauliflower, kale, Brussels sprout, turnip, radish, rapeseed (from which canola oil is processed), watercress, etc, etc, all of them with nutrients similar to those of cabbage, and all of them good for you.


At home, we remember the cabbage dishes grandmother used to make. She was a native of Thrace, a province in South-Eastern Europe, a region where cabbage and sauerkraut are popular cooking ingredients. 


Below is one of grandmother's recipes for cabbage: it's tasty and it's good winter fare. Sometimes this dish was served on its own, other times it accompanied roast chicken. I can still picture it in its serving platter in the middle of the table! 


Lahanorizo (cabbage and rice):


Ingredients:

3 tablespoons olive oil
2 onions, chopped
2 cloves garlic, minced
1 head of cabbage, shredded
1 lb canned tomatoes, chopped
3 cups vegetable broth
1 cup rice
1/2 cup raisins
1/4 cup slivered almonds
1/4 cup pine nuts
salt and pepper to taste

Directions:
  • In a Dutch oven heat the olive oil and saute the onions and garlic until the onions are translucent.
  • Add the cabbage and continue to saute, stirring frequently until the cabbage softens, about five minutes.
  • Add the tomatoes and broth and mix. Bring to a boil.
  • Add the rice, raisins, almonds, pine nuts, and salt and pepper. 
  • Stir, and let simmer over low heat until the liquid is absorbed and the rice is cooked. Make sure the rice does not dry out.
  • Place in a serving bowl, toss, then serve.

Saturday, 28 November 2009

THE LOST TURKEY NAMED BOB, by ALEX


Alex, my eight-year-old nephew who is in the third grade, wrote an essay as a class assignment. It's about Bob, a turkey who escaped from the truck that was transporting him to Washington DC. I suppose Bob didn't want to join all the other turkeys that inhabit our fair capital. Good for him! You will see after reading the story, that Bob found better accommodations.

After we assembled around the table for Thanksgiving dinner, my brother read to us "The lost turkey named Bob." Alex, the author of the piece was too bashful to read it to us himself. We listened, we applauded, and filled with mirth we began our dinner. I am thankful for my family and friends and I wish that each Thanksgiving I spend on this earth finds me just a bit wiser than the one before.


And now, here is the story of...


"The Lost Turkey Named Bob:"
written by Alex, who is in the 3rd grade.

     ON a nice November night a turkey named Bob was wandering in the very creepy woods. Bob did not know what was in the woods. But one day he found a house. The owner's name was ALEX. "Gobble, Gobble," said Bob. Alex let him in.
Meanwhile at a base somewhere in Canada...
BEEP BEEP BEEP BEEP!

"A turkey has escaped!"

"Where is it?" asked the commander. "How did it escape?" "Did it climb out of the truck?" "NOW WHAT DO WE DO?!"


Back at Alex's house the turkey was asleep safe and sound. The agents in Canada were planning what to do. "Okay does anyone know where Bob is?"

No one had any idea!

Bob was on his way to Washington D.C. to be the guest of honor at the White House when he jumped from the back of the truck. Alex was happy to have him in his house instead. Alex was a great host. The agents searched. They never found Alex's house.

It's lucky Alex only eats chicken.

The END.


When he is not playing host to Bob the turkey, Alex loves to play ice hockey.


Alex at summer ice hockey camp, with New Jersey Devils goaltender Marty Brodeur.


Summer 2009, Alex and dad Tasos, at hockey camp, post-practice.


Bob went on to have kids! 

Monday, 23 November 2009

CRANBERRY SALAD GELATINE MOULD


Experiment with different shapes of moulds. You can also use a Bundt cake mould. 


I'm going retro with this recipe, but I am hoping that one day it will come back into style. When I first made cranberry salad mould, it was still au courant, but that was a while ago. Since then it has become an absolute staple at our Thanksgiving table. It's both sweet and tart, it's crunchy, and above all, it's really, really fruity. It reminds me of a Waldorf salad with cranberries. It's very retro! It's also very colourful, and it's very much requested by family come Thanksgiving. I discovered the recipe in a magazine many years ago, and I made it by following the recipe precisely. Well, as the years went by I changed a bit of this, I added a bit of that, and then I went ahead and lost the original recipe. So I guess the current version is half borrowed, half invented and half taken from someplace else. Yes, in my world of mathematics there can sometimes exist three halves to one whole. Anyway, everyone loves this cranberry mould, and every Thanksgiving folks make sure I'll be making it. Sometimes, someone asks for the recipe. My reply is usually a perplexed smile, not because I don't want to give away any archival recipe secrets, but because I don't have a specific cranberry mould recipe written down. So now that I have my very own blog, and now that Thanksgiving is upon us, and now that I am getting ready to make my cranberry mould for the big day, I've decided to get the ingredients together and to write down the recipe while I am making it. This is a really good idea. After all, I am getting older, and who knows, I might start forgetting things. What would happen to Thanksgiving if I couldn't remember how to make a decent cranberry mould? People would be sad. No one will love me during the holidays. The stress would be unbearable. Here's the recipe, written down and saved for posterity.


Ingredients:
2 (14 ounces each) cans of whole berry cranberry sauce
2 cups pure cranberry juice, no sugar 
4 tablespoons lemon juice
2 (3 ounces each) packages of raspberry flavoured Jell-O
2 tablespoons of unflavoured gelatine
1/2 cup fresh pineapple cut up into small pieces 
1/2 cup chopped walnuts
1medium apple peeled, cored, and chopped into small pieces
1/2 cup of celery

Directions:
  • Buy that nice, really tart organic cranberry juice that contains nothing but cranberries. That one is the best!  
  • In a large saucepan combine the cranberry juice with the lemon juice and bring to a boil. Remove from the heat and add the Jell-O and the gelatine, stirring with a whisk until they completely dissolve into the juice.
  • To this add the cranberry sauce and keep stirring until it breaks up and mixes well with the warm liquid. Pour into a large glass container and place in the refrigerator. Keep an eye on it, and take it out of the refrigerator when it's almost set. 


  • Now comes the time to mix with the rest of the ingredients. They must be mixed in when the sauce is almost set. This way they will adhere to the gelatine, and they will be evenly distributed. If you add them when the sauce is still in its liquid state, they will float to the top and stay there.
  • Fold the pineapple into the cold cranberry sauce, gently mixing it well.  Add a little of the pineapple juice, not all of it.
  • Add all the other ingredients one by one until they are well incorporated into that beautiful red mush.
  • After everything is mixed well, pour it into a nice mould and place it back in the refrigerator.  Allow it to set completely.  It should be left in overnight.
  • When you are ready to serve it, take the mould out of the refrigerator and let it rest in a warm bath for just a few minutes and only a few minutes. This will allow the gelatine to loosen easily from the mould. If it stays in the hot water a little too long, it will begin to liquefy.  
  • Place a serving plate on top of the mould and carefully invert the salad onto the plate. It will look beautiful! You can decorate your serving plate with some greens or with additional fruit.  If you do not serve this right away, you can plate it a short while before dinner and then place it back in the refrigerator until it's time to bring it to the table. 
  • The ingredients listed here fill my mould plus allow for a bit to be leftover. I cool that portion in a plain container and save it for later. What you see plated here tends to disappear quickly.
 I decorated with mums from my garden and with kumquats.  I used one of my favourite colours for mums, white with a blush of purple! Beautiful! The blush of purple didn't quite come through in the photo, but trust me, it looked wonderful; a beautiful variety of mum!

Monday, 26 October 2009

Butter - Vanilla Cookies Topped with Cinnamon Sugar and Almonds


Close up, this doily almost looks like a spider's web. Perfect choice for this time of year, when we are so close to Halloween. I've started going through my cookie recipes, deciding which ones will be featured on this year's winter holiday menus. Here is a favourite: not too many ingredients, and well worth trying! Recommended! 

Ingredients:

1 1/2 cups unsalted butter at room temperature
3/4 cup powdered sugar (10x)
1/2 teaspoon salt
1 teaspoon vanilla extract
1 3/4 cups flour
Toppings:
Make an egg wash by beating together 1 egg and 2 tablespoons milk
Sliced almonds for topping
A mixture of cinnamon and sugar for topping
Salt and pepper to taste... (Just kidding. No salt or pepper needed)


Directions:

  • Preheat the oven to 350-degrees F/180-degrees Celcius. 
  • Sift the flour with the salt.
  • Beat the butter with the powdered sugar until light and fluffy. Incorporate the vanilla extract.
  • Slowly add the flour. 
  • When the dough is mixed, place it in the refrigerator for about an hour; it needs to rest. 
  • Line your cookie sheets with parchment paper. 
  • Take the dough out of the refrigerator and cut it into small pieces, moulding each into rounds about an inch and a half in diameter.
  • Brush the tops of the cookies with the egg wash. 
  • Sprinkle the cinnamon-sugar mixture over them
  • Place a few sliced almonds on top of the cinnamon sugar.
  • Bake for 20 minutes or until the cookies are golden in colour.
  • Remove from the oven, let them cool, and enjoy!
This cookie recipe is from Martha Stewart.


Saturday, 24 October 2009

Feta Cheese and Yoghurt Hand Pies


These small pies which can comfortably fit in the hands of school children are of Greek origin and are called Tyropitakia, meaning little pies with cheese. They are made with a crumbly yoghurt based dough. Quite simply, there isn't a kid in Greece (or an adult for that matter) who doesn't drool at the idea of eating these treats. Kids especially love them because tyropitakia are often included in their lunch boxes. It's a down-home comfort recipe that perhaps is not easily available to the tourists visiting Greece, and is therefore not so well known. But ask a kid if they want tyropitakia for a snack and you'll never get no for an answer. They are also good for taking along on a picnic, especially a picnic by the beach. 

I hadn't made them in years and years ... But I would think about them often! Tyropitakia are made with feta cheese that's encased by a soft, delicious dough. Very, very easy to make and just irresistable!!!


It took three tries to come up with this recipe; I adjusted the original version which included butter because I wanted a recipe for tyropitakia that were made with oil. In my opinion, this new version is great! Replacing the butter with vegetable oil made the tyropitakia taste moister and lighter.

In this version, the dough wasn't as fluffy, and that's because it wasn't dry enough; I had added an egg to it just for experimentation. But the egg wasn't needed. Incidentally, the name of this dough is kourou, which is a colloquially used term to describe a crumbly type of dough, meaning dough that lacks moisture (unlike bread) The word derives from the Turkish word kuru/dry.   

Ingredients:

for the dough:

250 grams all-purpose flour
4 tablespoons olive oil
200 grams Greek yoghurt (strained yoghurt)
1/2 teaspoon salt
1 teaspoon sugar
1 1/2 teaspoons vinegar
1 1/2 teaspoons baking powder
2 tablespoons grated Pecorino Romano cheese

for the filling (make sure ingredients are at room temperature):

2 eggs, beaten
250 grams feta cheese
3 ounces cream cheese 
3 ounces ricotta cheese
fresh chopped dill 
fresh chopped parsley

Additional ingredients:

1 egg beaten for the egg wash
sesame seeds for topping


Directions:

  • To make the dough combine the dry ingredients, mixing well
  • To the dry ingredients add the vinegar, yoghurt, olive oil and grated Pecorino Romano cheese. 
  • Mix by hand just until combined. Do not overmix. 
  • Place in the refrigerator and let rest for about an hour.
  • Prepare the filling: 
  • Crumble up the feta and mix all the filling ingredients until incorporated.
  • Preheat the oven to 350 F / 180 C.
  • Dive the dough into three parts and then divide each part into small pieces. 
  • Roll each piece into a round. For perfect rounds use a mould such as the mouth of a drinking glass.
  • Add one teaspoon of filling at the centre of each round
  • Fold the dough over to create a half-moon shape.
  • Decorate the edges of the dough with the tines of a fork. This will also help to seal the edges. 
  • Place the tyropitakia onto parchment-lined baking trays.
  • Brush the tops with egg wash and decorate with sesame seeds.
  • Bake for about 20 minutes, until golden. 
  • Take them out of the oven, let the tyropitakia cool slightly, and after that, you know what to do, no directions needed.
  • These guys can definitely be frozen and thawed as needed. 


Friday, 23 October 2009

or FASOLADA IS GREEK FOR BEAN SOUP!

Fassolatha is the Greek word for bean soup. This traditional, rustic soup is a meal that is simple to make, easy on the budget, and big on deliciousness. A favourite winter food, it definitely warms one up on a cold day! 


Beans are very nutritious. They contain almost no fat, are high in protein, fibre, complex carbohydrates, and are a great source of calcium, potassium, B vitamins, and iron. How perfect is that? Considering beans were one of the first crops to be cultivated by humans, they have played an integral part in the development of civilization. 

Fassolatha is a staple in Greek cuisine. I would call it Greek soul food. I would also call it the Greek national dish. Greeks not only savour a bowl of fassolatha, but they also respect it! Stories of hard times abound in Greece, times when folk would have beans to eat and nothing else. For example, during the World War II years, people would stow away a sack or two of dried beans to make soup with. Cooked with just water and perhaps some dried herbs, those dried beans were used to produce meals that would help folks survive winter. My older relatives would often recount stories of their experience during the brutal nazi occupation of Greece, and they would tell me how they staved off starvation through a steady diet of fassolatha. My father has said that during the war, to have had beans to eat was like being rich with gold! 

Fassolada, a rustic and satisfying soup. There is nothing fancy about it but it's delicious and sustaining.

Of course, during those times the soup was made without any oil; there was no oil available, therefore Greeks used just plain water. My mother told me that she didn't see a single olive for all the years of the nazi occupation, something I find to be an unsettling fact in a nation that produces high amounts of both olives and olive oil. Regrettably, most everything produced by Greeks was appropriated by the nazis. And yet, and yet ... fassolatha kept the Greek population going and resisting. Thyme and oregano grew wild on the hillsides, and the Greeks would pick them, and they would pick whatever other greens grew wild, and along with beans, they would have a war-time feast. 


Unfortunately, famine still exists in the world, and there are people (even in the good old USA), who do not have the means to supply food for their family. Among all the inequities in the world, this is one of the most horrible and painful. 

I always have a certain amount of reverence and love in my heart when I make this soup. It is Greek soul food, and much like American soul food, it has been on the table in good times and in bad, in times of plenty and in times of want.

Ingredients:
  • 1/4 olive oil
  • 1 large onion chopped
  • 3 ribs of celery, leaves included, chopped
  • 2 carrots, chopped 
  • 1 bell pepper, diced 
  • optional: a small hot pepper, sliced
  • 1 tablespoon tomato paste
  • 1 can whole tomatoes: I'll let you decide on the size of the can. 
  • Salt and black pepper to taste
  • 1 teaspoon fresh thyme
  • 2 teaspoons of dried oregano
  • 1 sprig of rosemary
  • 1 pound dried beans which have been rinsed, soaked overnight, and drained 
  • 6 to 8 cups water, and go ahead, substitute vegetable broth for some of the water, but make sure its salt content is low: beans will taste better when cooked fully before adding salt. 
  • 3 tablespoons chopped parsley
  • another 1/4 cup olive oil


Directions:

  • In a soup pot heat 1/4 cup of olive oil and add the onions, celery, pepper, and carrots.
  • Saute until the onions are translucent. Add the tomatoe paste and stir for about two minutes.
  • Add the black pepper, thyme, rosemary, and oregano. 
  • Carefully fold in the beans and the canned tomatoes.
  • Add the 6 cups of liquid and bring to a boil. As the soup cooks, a certain amount of the liquid will evaporate. If you don't like a thick soup, you may need to thin it out with more liquid. 
  • Lower the heat and simmer for about two hours: cook until the beans are soft. 
  • It was my mother's idea to start using canned beans. It's faster and convenient she said, plus "if they already soften them for us, why should I bother soaking them overnight?" However, what really prompted her to start experimenting with canned beans was that the dried ones in the US do not have a flavour or substance similar to those in Greece. But somehow, the canned ones fit the bill perfectly. If you will use dried beans check the expiration date: when dried beans have been hanging on the shelf too long, they will never soften no matter how long they are cooked for. 
  • About 10 minutes before turning off the heat add the parsley, the other 1/4 cup of olive oil, and salt to taste. Remember that salt always gets added last. 
Sometimes the soup is accompanied with lemon slices. 

Serve with some nice fresh bread and a salad, or ... Today, while the soup was cooking I decided to make some (Greek-style) empanadas for accompaniment. They turned out delicious! 

Greek-Style Feta Cheese Empanadas!


To make these empanadas you will need a package of ready-made empanada disks. A good brand to buy is the one from "Goya Foods," found in your grocer's freezer. There are ten empanada disks per package. Defrost according to instructions. 

Additional ingredients:

  • 3/4 cup of crumbled feta cheese
  • 1/4 cup of ricotta cheese
  • 2 Kalamata olives pitted and diced (optional)
  • 2 tablespoons chopped fresh parsley
  • 1 tablespoon chopped fresh mint 
  • A little olive oil and some Pecorino Romano cheese
  • Some water and a pastry brush


Directions:
  • Preheat the oven to 350-degrees F/180-degrees C. 
  • Line a baking sheet with parchment paper.
  • Make a cheese stuffing by mixing all the ingredients.
  • Take an empanada disk and using a brush, wet its circumference with a bit of water.
  • Place about a tablespoon of the stuffing on one half of the disk.  
  • Fold over the other half, joining it to create a half moon shape. 
  • The water you've used will make the two layers of dough adhere to themselves. Create a decorative edging using the tines of a fork. 
  • Place the empanada on your prepared baking sheet 
  • Repeat!
  • Brush the tops with some olive oil and sprinkle Pecorino Romano cheese as a topping. 
  • Bake for about 15 minutes, or until the dough develops a nice crust. 
  • These are not traditional empanadas, but the combination of cheeses and the fact that they are baked and not fried makes them irresistible. They are reminiscent of a Greek tyropita.