Showing posts with label Easter. Show all posts

Saturday, 24 April 2010

ROAST LEG OF LAMB AND POTATOES GREEK STYLE FOR EASTER! ARNI PSITO


For this year's Easter Sunday dinner we roasted two legs of lamb. Very easy to make. The lamb was out of the way once it started to roast, and that freed us up to do so many other things...The recipe given below is for one leg of lamb. Since I cooked two, I doubled it. Sometimes I make this same recipe with lamb that's off the bone. Works just as well. I cook lamb the low and slow way which makes it very juicy and meltingly soft. If you scroll down, don't get discouraged by the length of the recipe. I give detailed instructions, that's why the length, but let me reiterate that this is an easy recipe. And boy oh boy, no tough, fatty lamb for dinner with this one!


Ingredients:

1 leg of lamb on the bone (about 6 pounds) 
salt and pepper to taste
6 cloves garlic, peeled and cut in half
4 or 5 celery stalks
3 carrots  
6 Yukon gold potatoes, peeled and cut into wedges
4 sprigs rosemary
2 tablespoons dried oregano

6 sprigs thyme
Some grated pecorino Romano cheese

olive oil
1 large lemon
water

1/4 cup lemon juice


Directions:
  • Trim some of the fat from the lamb. How much? As much as your conscience wants you to. 
  • With a small knife make about 6 slits in the lamb and insert a piece of garlic into each one. Twist some kitchen twine around the lamb. Three rounds will be enough. I have devised this method so that I can keep the herbs attached to the meant as it cooks. 
  • In a small bowl, add two tablespoons of olive oil and the juice of one lemon. Whisk to combine, and rub the mixture over the surface of the lamb. Season with salt and pepper and with one tablespoon of the oregano.
  • Leave the carrots unpeeled; place them along with the celery on the bottom of a heavy baking pan and add the lamb on top. These vegetables are meant to serve as a rack, therefore arrange them accordingly, letting them rest mostly beneath the lamb. They are to be discarded once the lamb finishes cooking.
  • Pour one cup of water around the lamb.
  • Place in a preheated 450 F oven and roast for 20 minutes. Take the pan out of the oven, turn the lamb over, and roast for another 20 minutes. 
  • Lower the heat to 300 F and remove the pan from the oven. 
  • Arrange the potatoes and any remaining cloves of garlic around the lamb. 
  • Season with salt, pepper, the remaining oregano and with a small portion of the thyme and rosemary. 
  • Add the rest of the rosemary and thyme on top and underneath the lamb, wedging it in the twine. 
  • If the water was evaporated, replenish it so that it measures about 1/4 of a cup. Add the lemon juice to it.  
  • Sprinkle the Pecorino Romano cheese on top of the meat and potatoes. 
  • Cover with parchment paper and aluminium foil and place back in the oven. If the pan has a lid, add the lid on top of the aluminium foil. This will give you an exceptional seal, and that's what you want. 
  • Bake at 300°F for about 2 1/2 to 3 hours or until the meat can easily be pulled away from the bone.
  • Remove the aluminium foil and parchment paper and raise the temperature to 400°F; allow the lamb and potatoes to brown some more (about 20 minutes, but you be the judge with your own oven).
  • Take the lamb out of the oven, cut the twine and dress with some olive oil and if you like lemon juice, get yourself another lemon and go to town squeezing its juice over the lamb. 
  • Let rest before serving. 
Hints:
  1. It will be more convenient to slice the lamb on a cutting board and then place the meat onto a platter; it's just easier and more efficient to do this in the kitchen and not at the dining table. 
  2. Remove the potatoes to a serving dish. None of that fancy surround the lamb with them! Forget about it! Make things easy for yourself on this busy day.
  3. For those who want jus, strain the fat out the pan juices, then pour them into a gravy bowl. 
  4. This year we served everything buffet style by placing all the dishes on the server in the dining room. We had two tables set for guests, and both tables were within close proximity of the server; everyone helped themselves. One of the best ideas ever!!!!! It was informal and a lot of fun. And it was also more enjoyable for moi, the hostess!!!


Sunday, 21 March 2010

TSOUREKI or GREEK EASTER BREAD


This tsoureki bread can be whipped up at Easter or at any time of the year. Give it a try. It's not difficult to make at all. You just need a free afternoon. The recipe makes a very fragrant and tasty tsoureki. I guarantee that you will be overjoyed with the way it tastes! Plus, there is no kneading by hand, as is the traditional way. Here, the stand mixer takes over this job. 
There are lots of recipes for tsoureki out there ...  This one makes a brioche tasting type of dough, but it's a really fragrant brioche we're talking about!
Other than Easter, when tsoureki is usually served with coffee at the end of the holiday meal, this bread can be eaten year-round as a snack or for breakfast. Try it toasted with some orange marmalade on top.


Ingredients:

3 packets of active dry yeast (in the US, one packet contains 7 grams of active dry yeast) 
1/2 cup lukewarm water 
2 tablespoons sugar for the yeast 
1 to 1 and 1/4 cups sugar for the dough
4 large eggs 
1 cup milk, lukewarm
10 tablespoons unsalted butter, melted and cooled 
4 tablespoons unsalted butter, melted and cooled, reserved to be used at the end of kneading.
2 teaspoons ground mahlepi see note
1 teaspoons vanilla extract
rind from 1 large lemon
rind from 1 large orange 
1 mastic tear see note
7 to 8 cups bread flour, plus more flour if needed for a light dusting of your work area.
1 teaspoon salt 
parchment paper for the pans
1 egg yolk, beaten and mixed with 1 tablespoon milk and 1 tablespoon of sugar to make an egg wash for topping
Sliced almonds and/or sesame seeds to be used for topping


Directions:

  • All the ingredients must be at room temperature.
  • Grind up the mahlepi seeds to give you two teaspoons of ground up mahlepi.
  • Grind the mastic tear. Some recipes call for more mastic but this recipe calls for lots of flavourings, therefore, one mastic tear will suffice. Well ... okay, you can use the largest mastic tear in the jar! 
  • Mix the sugar with all the citrus zest, the mahlepi and the mastic.
  • Reserve 2 tablespoons of flour out of the total amount of flour the recipe calls for.
  • In a medium-sized bowl mix the yeast with the warm water. 
  • Add the reserved 2 tablespoons of flour and the 2 tablespoons of sugar. 
  • Stir, then let stand in a warm place until the mixture bubbles and foams and begins to rise, about 15 minutes. The mixture must rise, which is an indication that the yeast is still active. If the mixture doesn't rise, the dough will not rise. C
  • In the bowl of an electric mixer and using the paddle attachment, beat the eggs. 
  • Add the sugar with its flavourings; mixing them into the sugar distributes them evenly.
  • Add the milk.
  • Add the salt.
  • Add 10 tablespoons of the melted butter. 
  • Add the vanilla  
  • Stir in the yeast mixture.
  • Keep beating at low speed until incorporated. 
  • From now on, you will need to use the dough hook with your electric mixer, so go ahead and change to it.  
  • Add the flour, one cup at a time, beating well at low speed after each addition. Keep scraping down the sides of the bowl as needed. 
  • Gradually a dough will begin to develop which will be sticky. 
  • Keep beating on low, adding small portions of your flour just until the dough stops clinging to the sides of the bowl. 
  • The dough should be soft and really pliable. 
  • Remove the dough from the mixer and place it in a large bowl. Pour the last four tablespoons of butter over it and knead gently. Form the dough into a round shape.
  • Cover the bowl (not the dough; cover the top of the bowl) with a piece of plastic wrap and one or two or three clean towels. Leave in a warm place free of drafts. 
  • Let the dough rise until it has doubled in bulk, about 3 to 4 hours. 
  • Yeast is the ingredient that makes tsoureki (or any type of bread) rise, and as yeast is a live thing it is sensitive. Outdoor conditions such as humidity, heat, or cold, influence the manner in which yeast behaves. Tsoureki is more temperamental than regular bread dough because tsoureki is an enriched bread, meaning it contains heavier ingredients such as eggs and butter. If it's cold outside, it might not rise as quickly. If it's too hot ... If it's humid.... well you get the picture. Just do your best and keep in mind that practice makes perfect.  A friend purchased an electric blanket which is reserved only for tsoureki duty. She covers her dough with this electric blanket so that it can rise at an optimal temperature. She reports that all her tsoureki troubles are now over and her dough rises beautifully.  
  • This recipe, even though it requires patience during the rising, makes a very fragrant and tasty tsoureki. I guarantee that you will be overjoyed with the way this Easter bread tastes.
  • Once the dough has risen prepare to roll it out. Don't punch it down. Gently separate the dough into 2 even sections. Take each section, cut it into 3 pieces, and roll each piece into a rope, each about 14 to 15 inches in length.
  • Braid the ropes as though you are braiding long hair. Don't braid too tightly so that the tsoureki can bake evenly.
  • You will get two Easter loaves, or you could separate the dough into smaller sections to get a third loaf. Baking time will vary according to the size of the loaves. 
  • At this point preheat the oven to 350° F. 
  • Place each braid on a cookie sheet covered with parchment paper.  
  • Cover with a towel and let rise for about an hour until it has doubled in bulk.
  • Using a pastry brush, gently apply the egg wash and sprinkle with the almonds (or use sesame seeds for some of the loaves).
  • Bake approximately 30 minutes until the tsoureki is golden in colour. Keep an eye on the oven because baking time varies with each oven.
  • The tsoureki will be ready when the blade of a knife inserted into the centre of a loaf comes out clean. 
  • Let the Easter bread cool for about 20 minutes to half an hour before slicing. 
Tsoureki can be stored in the refrigerator.  It can be eaten cold, at room temperature, or even toasted. You can even freeze some to have on hand later on.


Note: Information about mahlepi is found here.  

         Information about mastic is found here.    


Sunday, 28 February 2010

KOULOURAKIA for EASTER; A Greek butter cookie


Ah, spring and the impending arrival of Easter ... Time to make koulourakia!!!


Here is my second recipe for koulourakia. Although I make version #1 anytime, the version here is the one I favour at Easter. It makes a larger quantity, and I find the flavours better suited to accompany tsoureki and all the other delicacies that abound during the Greek Easter celebrations. The dough is crunchy on the outside with a soft, crumbly interior, and the flavour is buttery. The addition of orange flavour is not overwhelming; one just gets a hint of the taste of orange. If you prefer a cookie with a more pronounced butter flavour, leave out the orange. This recipe makes approximately eighty cookies.


Ingredients:

250 grams/9 ounces unsalted butter, allowed to soften
2 cups caster* (superfine) sugar
5 eggs, separated 
1 egg yolk
1 and 1/2 teaspoons vanilla extract
1/2 teaspoon orange extract
The zest from one orange
1 cup lukewarm milk
1kilo all-purpose flour (8 cups)
1 teaspoon baking soda
1/2 teaspoon cornstarch
3 teaspoons baking powder 
Egg wash: beat two eggs with one tablespoon of milk. 
Sesame seeds for topping, but that's optional.


No sesame seeds here, but koulourakia with this round shape would look particularly good with some sesame seeds scattered on top of them. 


*CASTER SUGAR

Not necessary to purchase it; it can be prepared at home! 

The advantage of using caster sugar is that it dissolves quickly and easily, a feature one wants in cookie recipes. Caster (or superfine) sugar is granulated sugar that has been ground enough to take on a superfine quality. This is easily achieved by processing granulated sugar for about one minute or two, inside a blender or food processor. One or two minutes will suffice. If processed for a longer period it will reach the consistency of powdered (confectioner's) sugar. 

Grind more than the amount called for in a recipe because some granules will turn into sugar dust. Cover the processor lid so as not to have sugar dust escape onto your working area. 


Directions:

  • During whisking, periodically turn off the mixer so as to scrape down the sides of the bowl; make sure all the batter is well incorporated. 
  • Combine the baking powder, cornstarch and baking soda with one cup of the flour. Set aside.
  • Into a very clean bowl of your stand mixer, using the whisk attachment, beat the egg whites until stiff peaks form. Remove them from the bowl and reserve. Make sure there's no egg yolk, butter, or any other form of fat which comes into contact with the egg whites as they are being whisked. The presence of fat will not allow egg whites to reach the meringue/stiff peak stage. 
  • Clean the bowl of your mixer — at this point, it's okay to wipe it off with a paper towel. 
  • Add the butter and whisk until smooth.
  • Add the caster sugar and beat until the butter and sugar appear light and fluffy. 
  • Continue to beat, adding the egg yolks one at a time. 
  • Add the vanilla, orange extract and orange rind. 
  • Add the milk and mix. Turn off the mixer. 
  • Fold in the reserved egg whites.
  • During whisking, periodically turn off the mixer so as to scrape down the sides of the bowl; make sure all the batter is well incorporated. 
  • Change to the dough hook. Add the reserved one cup flour/baking powder mixture into the butter/sugar mixture. 
  • Slowly add the rest of the flour. The mixture is ready when a dough has formed that doesn't stick to the sides of the bowl. 

  • Preheat the oven to 350F/180C. Have a seat and start shaping the cookies: take pieces of the dough and form them into spheres of about 3/4 of an inch in diameter. 
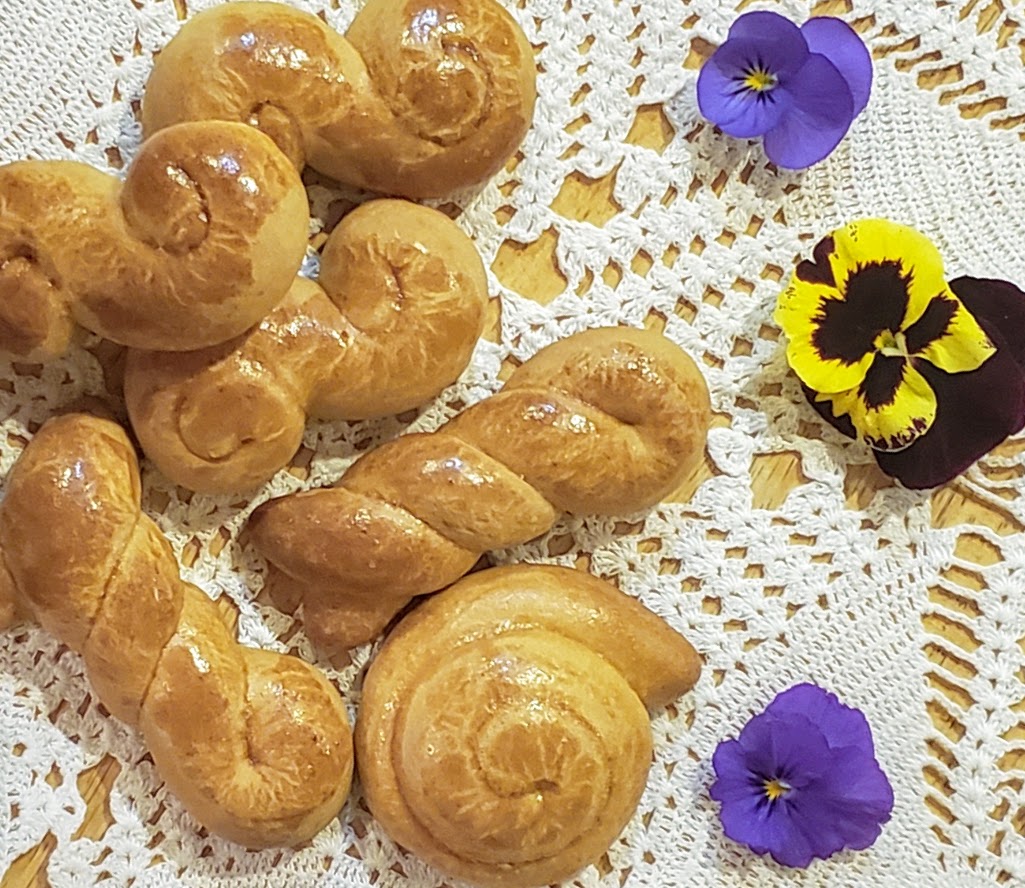
  • When finished forming the spheres, roll each into a rod shape and fold it in half, then twist the two halves together. This is the most popular shape, but there are others you can make: for example, you can form an S and then roll in the ends. as you see in the picture below. Or make little circles or shells.

An overview of different shapes

This spiral is the most popular shape. 

A serpentine shape
Another nice shape. This will look particularly nice if topped with sesame seeds!

  • Place the cookies on parchment covered cookie sheets and brush them with egg wash. This is the point where you decide if sesame seeds will decorate your cookies this year. If you lean towards the affirmative, sprinkle the seeds with a light touch. Don't overcoat the cookie with them. 
  • Bake for about 25 minutes give or take, rotating the pans halfway through baking. The cookies should come out of the oven lightly golden, not too brown.
  • Take them out of the oven and allow them to cool slightly. Remove them from the cookie sheets carefully, as koulourakia can be fragile. Stack them in layers inside cookie tins.


  • Koulourakia will keep for up to two months unless you have little mice in your house. I am referring to the two-legged variety of little mice that can open tins and take out handfuls of koulourakia to enjoy with a glass of milk. If you have those little mice, don't count on these cookies lasting as long as two months.
I make these cookies once yearly, at Easter time. Usually, I'll take a photo of them to show friends ... If the photo is enough to my liking, I'll post it here. I've reached the point where I have way too many pictures of these cookies. I should stop photographing them, is what I should do. However, as far as koulourakia go, this is an excellent recipe and so I like to show it off!