Friday 25 June 2010

KOULOURIA


Koulouria are a very popular street food all over Greece. They are made in commercial bakeries and are sold as a morning or mid-morning snack. By 1:00 pm or so, vendors are sold out. I guess you can say koulouria are a street food with pedigree since there is historical evidence that they were sold in the streets of Constantinople, the capital of the Byzantine Empire, as early as 800 to 900 CE. (They are discussed in an army manual of the 9th century. See my entry about koulouria here). If you are far from Greece and miss the crunchy, sesame taste of koulouria, here is a recipe you can try that will ease your nostalgia.


Ingredients:

3 cups bread flour plus more for dusting
1 cup lukewarm water
2 teaspoons active dry yeast
1 teaspoon salt
3 teaspoons sugar
1/3 cup vegetable oil, plus extra for greasing the bowl and the dough
1 cup sesame seeds (you may need more)
one medium-sized bowl filled with water at room temperature

Directions:
  • Place the yeast, sugar, salt and 1/3 cup of oil in the bowl of your mixer. Add the water and mix everything with a wooden spoon, stirring until all the ingredients are well incorporated.
  • Add one cup of flour, place the dough hook on your mixer and start mixing on low speed. Add the rest of the flour one cup at a time, mixing well after each addition. Keep mixing until you have a smooth dough. You'll know it's ready if it does not adhere to the sides of the bowl as it's being mixed.
  • Remove the dough to a large bowl that has been greased with vegetable oil. Grease the top of the dough ball with vegetable oil, cover the bowl with plastic wrap and then cover it with a kitchen towel.
  • Place it in a spot that is free of drafts and let it rise until doubled in size, about 2 hours.
  • When the dough has doubled in size punch it down, cover it again in the same manner, and let it rise until it's doubled in size once again, about 1 hour.
  • Punch the dough down once more, remove it from the bowl and cut it into chunks of dough that are about one-inch square.
  • Sprinkle a small amount of flour on your working surface and roll each piece of dough into a strip. Line up the strips and sprinkle flour over them until they are lightly covered.
  • Have the following ready: a bowl filled with water, a clean dish towel, and a flat pan filled with the sesame seeds.
  • Dip each strip of dough into the bowl of water and lightly dry it on the towel. Dry it just enough to remove excess liquid. The dough needs to be somewhat wet.
  • While the strip of dough is still wet, drop it in the pan with the sesame seeds and roll it around until it's coated in seeds.
  • Cover all the strips in sesame seeds.
  • Twist the strips into round shapes and pinch the ends together to make rings. Why should koulouria have a round shape? Look at the picture below:

A modern-day vendor. Round-shaped koulouria are easy to stack and easy to carry and sell. If you have a  few wooden dowels you're in business. Merchants have carried them around in this manner for centuries. 

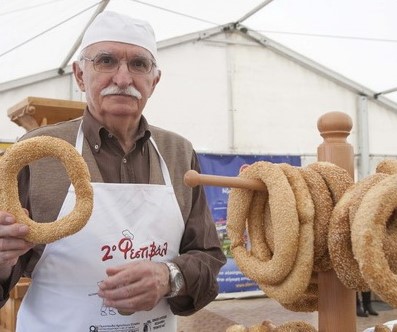
Here's a modern-day display stand, but in the old days, a nice plain dowel did the job just as well!

  • Although koulouria are traditionally made into ring shapes, I like to make both strips and rings. Strips take up less space on the baking sheets, allowing me to fit more on each sheet and finish the job faster. 
  • Place on sheets lined with parchment paper and bake in a preheated 425°F oven for 10 to 15 minutes, until they are golden brown.
  • Koulouria should be crunchy on the outside and soft on the inside. Serve them warm. They taste best if consumed the same day they are made. Unless you are feeding a crowd, you won't be able to eat them all in one day. Store them in an airtight container and enjoy them during the week. They tend to get really crunchy-hard if they are left over, but believe me, they still taste great and can be enjoyed as breadsticks. 

Wednesday 23 June 2010

SHRIMP SAGANAKI (GARIDES SAGANAKI)


A saganaki is a small two-handled frying pan that was traditionally used in Greece to prepare pan-seared mezé (appetizers). The saganaki would usually go from oven to table and thus gave its name to various dishes that were prepared in it, the most popular of which seems to have been cheese saganaki, a dish made with fried, bubbly cheese.

Another favourite saganaki dish is the one I have made here, garides saganaki, or shrimp saganaki. One doesn't need the special frying pan to make this. These days any ovenproof dish will do. 

I've increased the ingredients in this recipe because I will be serving a larger crow. But ideally, a saganaki appetizer is meant to serve just a few people. Let's say it's meant to be shared by two. Therefore, feel free use a smaller amount of ingredients, something which will serve two.


The shrimp must be quickly sautéd and then mixed in a tomato base, topped with feta cheese and heated before served. It makes an absolutely delicious appetizer or first course. If you like shrimp and feta cheese, blend them together to make this wonderful dish. You will love it!

Ingredients:

20 to 25 large shrimp, peeled and deveined
6 tablespoons olive oil
1 tablespoon butter
1 onion, chopped
2 scallions chopped
1 small green pepper or better yet one sweet Italian frying pepper, very finely chopped
3 large ripe tomatoes, peeled, seeded and chopped
salt and pepper to taste
2 tablespoons parsley
2 tablespoons dill
1/2 cup feta cheese, crumbled
optional: 1/4 cup shredded kasseri cheese, or use gruyere. 

Directions:


  • In a large skillet heat 4 tablespoons of the oil and add the onion and pepper. Cook stirring until the onion is soft. 
  • Add the tomatoes, season with salt and pepper and cook until they are soft and most of the liquid in the skillet has evaporated. Place the tomato mixture in a bowl and keep it warm. 
  • Heat the remaining oil and the butter in the same skillet, add the scallions and shrimp, and cook about 2 minutes. 
  • Stir in the parsley and dill and half of the feta, and cook until the feta is soft, about 2 minutes.
  • Mix all the ingredients together and add them to an ovenproof serving dish. 
In this case, the shrimp was "to go," which means I transported it to someone's home and finished cooking it there. I picked a convenient, inexpensive container to transport it in.
  • Sprinkle the rest of the feta cheese and all of the kasseri cheese on top.
  • Place in a pre-heated 425°F oven and heat until the kasseri starts to melt and brown, about 3  minutes. 
  • Serve as an appetizer accompanied with bread to mop up the sauce. 
  • Total cooking time for the shrimp is seven minutes ... It's usually enough time, not too long. If using frozen shrimp make sure it's completely thawed before starting to cook. Make sure all shrimp is dried with paper towels before placing it in the cooking pan.
Sparky waiting for something ... 

And good luck in your cooking adventures,  and if you try this shrimp saganaki, I hope you enjoy it!


Sparky's the man! He loved sampling the shrimp saganaki!!!

Wednesday 16 June 2010

CHICKEN WITH PEPPERS AND MUSHROOMS CACCIATORE STYLE


This is a family favourite. I like to make it with skinless, boneless chicken. Before cooking the chicken, I like to marinate it so that its flavour is enhanced. When the dish has finished cooking, the flavour of the peppers, chicken, thyme, and oregano blend together very nicely. We have served this dish accompanied by noodles with some of the sauce poured over, but usually, we eat it with no accompaniment other than a slice of bread.


Ingredients:

6 pieces of boned, skinned chicken
5 tablespoons olive oil
1 onion, sliced
1 garlic clove, chopped
1 cup of sliced mushrooms
2 yellow peppers, sliced
1 cup chicken broth
2 fresh medium tomatoes peeled, seeded, and chopped
2 tablespoons fresh thyme
1 tablespoon dried oregano
salt and pepper to taste
chopped parsley for garnish

For the marinade: 

salt and pepper 
1 clove of garlic, finely chopped
a few sprigs of thyme 
2 tablespoons olive oil
1 tablespoon Pecorino Romano cheese
a few dashes of balsamic vinegar

Directions:

  1. Rub the chicken with the marinade ingredients and place it in a bowl. Refrigerate for about two hours. Bring the chicken to room temperature before cooking.
  2. Heat 2 tablespoons of the oil in a large Dutch oven over medium-high heat. Brown the chicken on all sides, remove it to a bowl and set it aside.
  3. In the same Dutch oven heat the rest of the oil, add the onions, peppers, oregano, and garlic, season with salt and pepper, and cook for 10 minutes until the peppers have softened.
  4. Add the mushrooms, stirring, and cook until they are soft. As you are stirring, the pan will deglaze.
  5. Stir in the tomatoes and the thyme and season with salt and pepper.
  6. Add the chicken broth. 
  7. Add the reserved chicken and simmer until it's tender and the liquid is almost gone, about 40 minutes. You want this dish to be juicy and saucy, not dry.
  8. Serve the chicken accompanied by noodles if desired. Spoon the sauce over, and garnish with Parmesan cheese and parsley.

Monday 14 June 2010

TRICOLOR VEGETABLE PÂTÉ


Pâté is a paste of ground meats and fat that's seasoned with herbs and brandy and have you ever heard what they do to the poor ducks, do you know how they fatten them up to make liver pâté (pâté de foie gras)? It's a reprehensible process. However, there are vegetables pâtés one can make, and that's the only way to go!

I like making this particular vegetable pâté because, frankly, it's easy to prepare and involves no cooking what so ever! Okay, it involves the roasting of a few cloves of garlic, but that hardly counts as cooking.  This pâté is one great and healthy appetizer. Win, win, win! Serve with bread slices and enjoy! 

METHOD:

Roast 6 cloves of unpeeled garlic. The garlic will soften and turn yellowish when it's done. Take it out of the oven, allow it to cool, discard the peel and set the roasted garlic aside.
  • White bean layer:
1 15-ounce can white beans, rinsed and drained thoroughly
1 small jar of artichokes, rinsed very well
2 tablespoons fresh lemon juice
2 tablespoons olive oil 
1 teaspoon dried oregano 
2 teaspoons fresh thyme
half of the roasted garlic cloves

  • Red Pepper Layer:

1  7-ounce jar roasted red bell peppers, drained well and chopped
1 cup crumbled feta cheese, make sure it's patted dry
1/4 cup whole unseasoned almonds (and while you're at it, make sure they're shelled, and how funny am I?)
1 tablespoon grated Parmesan cheese 
salt, pepper, and oregano to taste
  • Pesto Layer:
The remaining roasted garlic cloves
1 1/2 packed cups fresh basil leaves
1 cup packed fresh Italian parsley leaves
3/4 cup toasted pine nuts
3 tablespoons olive oil
2 tablespoons grated Parmesan cheese
1 cup ricotta cheese 
  • Fresh herb sprigs for decoration, Bread slices
To Assemble:

Line an 8 1/2 x 4 1/2-inch loaf pan with plastic wrap which overlaps the sides (you can also line with parchment paper).
  • For the Bean Layer: Place the beans in the food processor. Add lemon juice, artichokes, olive oil, oregano, thyme and garlic and blend until smooth. Season to taste with salt and pepper. Press down well and spread the bean mixture evenly on the bottom of the prepared loaf pan. 
  • For the Red Pepper Layer: Combine feta, almonds peppers, salt, pepper and oregano in the food processor, and blend until smooth. Spread the pepper mixture evenly over the bean layer in the prepared dish.

  • For the Pesto Layer: into a food processor add the garlic, basil, parsley and pine nuts and mince. With the machine running, gradually add the oil through the feed tube and process until smooth. Mix in the cheeses. Spread the pesto evenly over the red pepper layer.
  • Cover with plastic wrap and refrigerate overnight. To unmold, place the pâté in the freezer for about half an hour until it becomes hard. Remove it from the freezer and invert it onto a serving platter. Peel off the plastic wrap from the pâté. Garnish with herb sprigs and accompany with bread slices.
Based on a recipe from Bon Apetit (10/1993)

Sunday 13 June 2010

TOMATO JAM: This jamin' jam is better than ketchup!


This recipe for tomato jam has a rich tomato taste with a hint of sweetness, and when you first taste it, it makes you never want to use ketchup again. It's a low fat, low calorie, low cholesterol treat to use as a topping for grilled foods. In the summer, when tomatoes are plentiful, I like to make it with fresh tomatoes rather than canned. I use 14 to 16 tomatoes, peeled, chopped and seeded. Since fresh tomatoes contain more liquid, cooking time needs to be increased to about 40 minutes. The jam should have a thick texture. Tomato jam is a great topping for burgers, potatoes and just about any grilled meat. This recipe makes about two cups, but if you want less jam, the recipe can be easily cut in half.


Ingredients:


3 tablespoons olive oil
2 cups finely chopped onions
3 garlic cloves, minced
2 14-ounce cans diced tomatoes in their juice
2 tablespoons sugar
3 tablespoons fresh thyme leaves
1/2 teaspoon salt
1/2 teaspoon black pepper


Directions:


  • Heat the oil in a saucepan over medium heat. Add the onion and garlic, and cook until the onion is very soft and translucent, stirring often, about 8 to 10 minutes.
  • Add the tomatoes with their juice, the sugar, thyme, salt, and black pepper. Cook over medium heat stirring occasionally, until most of the liquid has evaporated. This should take about 25 minutes.
  • Cool and refrigerate.

Wednesday 9 June 2010

How a chef honoured a legend: CHICKEN TETRAZZINI


The coloratura soprano Luisa Tetrazzini was a native of Florence, Italy, and a beloved international presence on the operatic stage of the early twentieth century. One of her most beloved cities was San Fransisco, where she performed often and where the fans adored her. Although Miss Tetrazzini was Italian, chicken Tetrazzini is an American dish, invented in honour of the soprano by a San Fransico chef. 

Tetrazzini possessed an amazing voice, masterful, powerful, technically superb. Her delivery as she raced up and down the scales was seamless and overwhelming to hear. I include here a perfect example of her singing prowess: her rendition of Rosina's aria Una Voce Poco Fa from Rossini's "Il Barbiere di Siviglia," sung in her soaring, clear coloratura. This recording, amazingly moving in its beauty, was made in 1911. I hope you enjoy it. Thank you Diva Luisa Tetrazzini!!!


CHICKEN TETRAZZINI:


Ingredients:

2 to 2.5 pounds of skinless chicken with bones
1 carrot, washed and roughly chopped
 
1 onion studded with 2 cloves
3 stalks celery with leaves, roughly chopped 
2 bay leaves
2 tablespoons of dill 

Salt and pepper
Water

1 large onion, finely chopped 
8 ounces sliced mushrooms 
8 ounces green beans, trimmed and cut into 1-inch pieces
  • 8 ounces frozen peas 
  • 8 tablespoons butter
  • 2 tablespoons olive oil
4 cloves garlic, minced
2 tablespoons fresh thyme leaves

1 teaspoon dried tarragon leaves

4 tablespoons flour
2 cups half and half, at room temperature
2 cups hot chicken broth
1/4 cup chopped Italian parsley 

3 tablespoons ricotta cheese
1/2 cup grated Parmesan cheese
1/2 cup shredded fontina cheese
1/4 cup breadcrumbs
sliced almonds

1package linguini

Directions:

  • In a kettle place the chicken, onion with cloves, celery, salt and pepper to taste, bay leaf, dill, and carrot. Cover with water and bring to a boil. Reduce the heat and simmer, covered, until the chicken is tender. 
  • Remove the chicken from the broth and let cool. Remove the meat from the bones and discard the bones. Cut the chicken meat into chunks and place in a large bowl. Strain two cups of the chicken broth and reserve it, making sure it stays hot.
  • Preheat the oven to 400° F.
  • Grease a 13” x 9” x 2” baking dish with 1 tablespoon of butter.
  • Heat the oil and 1 tablespoon of butter in a nonstick frying pan. Add the mushrooms and sauté over medium-high heat until the liquid from the mushrooms evaporates, and the mushrooms become pale golden. Add the onion and green beans and sauté until the onion is translucent. Add the garlic, thyme and tarragon and sauté for one more minute. Remove from the heat and mix in the peas.  
  • Transfer the mushroom and pea mixture into the bowl with the chicken.
  • Melt 4 tablespoons butter in the same pan over medium-low heat. Add 4 tablespoons flour and whisk until blended. Whisk in the reserved 2 cups hot broth, 2 cups half and half, and salt and pepper. Increase the heat slightly. Simmer, whisking until the sauce thickens. Turn off the heat, add the ricotta cheese and mix well.
  • Add the sauce and parsley to the chicken mixture. 
  • Add the fontina cheese and half the Parmesan cheese. Toss until the sauce coats everything and the mixture is well blended.
  • Transfer the mixture to the prepared baking dish. 
  • Mix the rest of the Parmesan cheese with the breadcrumbs, remaining butter and sliced almonds. Sprinkle over the chicken mixture. Bake until golden brown on top, about 15 minutes.
  • Meanwhile, bring a large pot of salted water to a boil. Add the pasta and cook according to package directions. Drain.
  • Serve the pasta topped with the chicken. 

KOULOURIA, KOULOURAKIA. WHAT'S IN A NAME?


Koulourakia, a wonderful dessert served here with a cup of coffee (photo by Sweet Almond Tree)

Koulouria for sale. Grab them while they are still fresh!!!

Is there is a difference between koulouria and koulourakia? The answer is yes, and here are the details:

1.  Koulouria (koulouria is the plural tense and koulouri is the singular tense)

These are somewhat large, bread-like wreaths or rings, smothered in sesame seeds and traditionally served as street food. They are crunchy on the outside, soft on the inside, sesame-doughy tasting, and a great treat to eat. They are carbohydrate-rich and low in fat and make a very satisfying snack. Greeks eat a very light breakfast, so a crunchy late-morning snack of koulouri holds them over until the mid-day meal. Koulouria are generally mass-produced by specialized bakeries, but there are recipes available for home cooks. (Find my recipe for koulouria here). Bakeries make koulouria at night so that their product can be ready early in the morning for the waiting vendors who will then sell them as snack food.

One of my homemade versions ... (photo by Sweet Almond Tree)

Vendors cluster around markets and crossroads. Some have stationary street stands, while others are mobile, moving according to demand. Most vendors are sold out by noon: Koulouria go fast. When I was a kid, attending elementary school in Thessaloniki, I used to consider myself lucky if I had the necessary sum of one drachma to buy a koulouri during recess. Sometimes, if our school vendor was in a good mood, she would ask us to cup our palms and she would pour into them the sesame seeds left on the bottom of the trays once the koulouria were sold out. A fist full of roasted sesame seeds can make a kid very happy.


Sesame is used liberally, therefore there are always leftover sesame seeds at the bottom of a tray. This vendor's koulouria are perfection itself and precisely what a commercially made variety should look like! Food heaven in a basket!!!

Etymologically speaking, the word koulouri derives from antiquity. In ancient Greece, the word kollyrio* described a small round-shaped bread made of barley flour. Later on, during Byzantine times, kollyrio evolved into the word kollykio, and that word evolved into the modern day word koulouri. All three mean the same thing: a small roundish bread. (Hold on. We're not done: In some regions, it’s also known as semiti or simit, a term that derives from the Greek word semigdali -- semolina to us. Semigdali or semolina is nothing else but hard or durum wheat, the type of wheat used in bread flour).  

Koulouria were a popular street food in Thessaloniki and Constantinople both during the Byzantine and Ottoman periods. Waves of Greek refugees from Constantinople and Asia Minor reintroduced the koulouri to the Greek mainland during the early part of the 20th century. A large number of these refugees settled in and around the city of Thessaloniki which is located in northern Greece. Soon, koulouria made and sold by refugees could be found all over the city, a reason these delicacies, no matter which city they are sold in, are known as "koulouria of Thessaloniki." Their popularity continues to this day.


Homemade koulouri, made smaller than the commercial variety. The smaller size is best for home ovens (photo by Sweet Almond Tree)

Here is a personal observation: Look at the picture of the koulouri at the top of this paragraph. Do you see the part where the dough has been linked to form a ring? It's clearly visible because it forms an indentation in the koulouri. That is the most delicious part to eat. Since it's been pressed down, it's crunchier, denser, and thinner. It has a taste all its own. As a kid, I used to save this "link" for last, and sometimes I would hide it in my pocket to eat as a special treat later in the day. Eating that little bite was a delight! In the playground, there were two types of kids: those who loved that link and those who didn't. The links were a commodity to be traded or used as ransom in our hide-and-seek games.  Sometimes you could wind up with two or three in your pocket, and then you would be considered rich! 


This mural, dating to the Byzantine era can be found in Thessaloniki. It shows three comrades selling koulouria outside a bakery! 

*The word kollyrio is the etymological root of the word “collyrium,” which is used in the field of ophthalmology. A collyrium was an ancient medicinal preparation: a piece of soft bread was soaked in a remedy and used as an eye compress. Today, a collyrium is a lotion or liquid wash used as a cleanser for the eyes, particularly in diseases of the eye.

I can't not mention that although this is a beloved and celebrated snack, the life of a koulouri vendor (he is referred to as a koulouras) is a difficult one. Selling anything on the street was and is very hard work. As recently as the early 1950s it was usual practice to employ children as vendors. I'd like to share some photographs:


A modern-day vendor at a festival concession. Today, koulouria are also sold in shops and are available in different varieties such as stuffed with cheeses, olives, vegetables, hams, or chocolates. Myself, I am a purist. Give me the original version, please.
  
I can't decide if this is a customer or a vendor ... 

Thessaloniki 1947
This photograph was not dated but I assume it was taken in the late 1940s. War, poverty, famine, and misfortune nearly destroyed Greece during 1940 - 1950. 

A young vendor from Crete, 1900. To young, but unfortunately, such was and is life.
Notice the traditional Cretan breeches, a style made popular during the 14th and 15th centuries when Cretan men worked on Venetian ships. Versions of these breeches remain part of the traditional Cretan costume. 

Let's now discuss koulourakia (the word means  small koulouria):

2.  Koulourakia  

Koulourakia are small, buttery, desert-type cookies. Today they can be eaten at any time, but historically they were made during holidays and times of celebration. Koulourakia can have various shapes such as twists, circles, serpentines, you name it. The shape depends on the region where they are made and the preference/stamina of the person making them. The basic recipe has flour, some sugar, and lots of butter. The texture is crumbly, crunchy but not hard, and the taste is buttery with hints of the flavourings used. There are several flavourings to choose from: orange, lemon, brandy, ouzo, vanilla, etc. Koulourakia are brushed with egg wash before baking, and it's traditional but not necessary to top each one with a few sesame seeds. When koulourakia contain spirits, they are called koulourakia methysmena, which means drunk koulourakia. In some regions of Greece, probably for dietary reasons, spirits are not used for flavouring. Anise can be substituted, to give the hint of the ouzo taste. After all, ouzo, the famous and omnipresent Greek apéritif, is flavoured with anise. 

You can find one of my recipes for koulourakia by clicking here. I should mention it was my mother's recipe, and the koulourakia pictured at the top of this post, the ones next to the coffee, were made by both of us: she made the dough, I shaped them. She used to say the recipe was the best one for koulourakia she had ever tried ... given to her by a dear girlfriend.  

Koulourakia before going into the oven (photo by Sweet Almond Tree).

Note: some of the information on street food and on the etymological origins of the word "koulouri," is taken from the book "Street Foods, World Review of Nutrition and Dietetics, Volume 86" edited by Artemis P. Simopoulos and Ramesh V. Bhat

Four of the photographs are mine, and the rest were taken from Parallaxi, an online magazine.