Showing posts with label Bread. Show all posts

Tuesday, 12 March 2013

A HEALTHY PITA PIZZA FOR BREAKFAST


Looks good, doesn't it?  Covered with fresh vegetables, low-fat feta cheese, low-fat turkey sausage, a low-calorie thin crust in the form of pita bread, all topped with a luscious egg to give us that extra supply of protein.  Some freshly grated Pecorino Romano cheese, and a few shakes of freshly ground black pepper, and there it is:  A crunchy, irresistible and quick treat for breakfast.  This will make a wonderful breakfast, but I've had it twice now for dinner.  So it's my version of breakfast for dinner, and I love it!  Easy to prepare. Here is how:

Ingredients:

pita bread
low-fat breakfast sausage, casing removed
1 plum tomato, chopped
1 mushroom sliced
a handful of fresh spinach, coarsely chopped
a few fresh sage leaves, chopped
some freshly grated Pecorino Romano cheese
2 tablespoons feta cheese, crumbled
1 egg, taken out of the shell and left whole


Directions:

  • Preheat the oven to 400 F.
  • Heat a skillet over medium-high heat and add the sausage. As it cooks, break it up in small pieces. Take it off the heat when it's no longer pink.  
  • To the skillet add the tomatoes, sage, spinach and mushrooms. Mix and sauté for a minute.
  • Place the pita bread on a baking pan and sprinkle the feta cheese over it.
  • Layer the sausage mixture and vegetable mixture on top of the feta cheese.
  • Place the egg in the middle of the pita pizza.
  • Place the baking pan in the oven and cook for 15 to 20 minutes, until the egg white is set but the yolk is still runny.
  • Take out of the oven, season with the black pepper and sprinkle the Pecorino cheese over the whole pita.
  • Eat hot and enjoy! 
Variation: Cook the pizza for about 10 minutes without the egg, take it out of the oven, add the egg and then finish cooking it. This method will yield a very crispy crust. 


Thursday, 24 January 2013

WHOLE WHEAT RAISIN WALNUT BREAD


A very delicious and nutritious whole wheat bread, loaded with raisins and walnuts, with a crunchy, sweet taste. The kind of bread you can't say no to. Freshly baked bread on a winter's day, what a special treat!


First off, I bought a bag of 10-grain bread mix, which is made by Bob's Red Mill and makes great bread. This brand can be found at most supermarkets and can also be ordered online. I added some whole wheat flour, some bread flour, some sunflower seeds, and some wheat germ. By the time I got through combining, I think my bowl contained pretty much every type of flour available. This was a very easy bread to make; I just had to be patient while the dough was rising. The wait was worth it!  

As a suggestion, Bob's Red Mill 10-grain bread mix can be purchased here if you are having trouble finding it at your local market. This flour contains approximately 30 grams of sugar which is a good amount to help the yeast rise. I take this sugar content into account and then I add an additional 2 tablespoons of honey whereas if there were no sugar in the Bob's Red Mill Flour Mix, I would add 4 tablespoons of honey. Below is the list of ingredients of Bob's Red Mill ten grain bread mix: 
 
ENRICHED FLOUR (WHEAT FLOUR, MALTED BARLEY FLOUR, NIACIN, IRON, THIAMINE, RIBOFLAVIN AND FOLIC ACID), WHOLE WHEAT FLOUR, ROLLED OATS, VITAL WHEAT GLUTEN, CANE SUGAR, WHOLE WHEAT FARINA, NON-FAT DRY MILK, RYE MEAL, RYE FLOUR, CORNFLOUR, OAT FLOUR, TRITICALE FLOUR, OAT CEREAL, SEA SALT, ACTIVE DRY YEAST, BROWN RICE FLOUR, MILLET FLOUR, WHITE BEAN FLOUR, CORN GRITS, MILLET GRITS, TRITICALE GRITS, BARLEY GRITS, BROWN RICE FARINA, SOY LECITHIN, OAT BRAN, FLAXSEED MEAL.

You'll notice that the mix contains triticale flour. What is it? Good question! Here is some information:
Triticale (X Triticosecale) is a hybrid grain obtained from crossing rye (Secale) and wheat (Triticum) grains. The earliest attempt to develop triticale is attributed to the Scottish scientist A.S Wilson and was not very successful. In 1898, an Australian agronomist named W. Farrer successfully produced triticale by crossing Willet Wheat with Alabama’s rye.

Here is how to make my delicious Whole Wheat Raisin Walnut Bread:

Ingredients:

1 bag (19 ounces) 10-grain bread mix (remove the yeast package that comes inside the bag)
10 ounces whole wheat flour
6 ounces bread flour
5 tablespoons sunflower seeds
4 tablespoons wheat germ
2½ tablespoons active dried yeast (use the envelope that comes with the bread mix, that’s one tablespoon, and then use more active dry yeast from your own supply)  
2 tablespoons honey
Approximately 20 ounces of warm water
8 ounces roughly chopped walnuts
6 ounces raisins
some bread flour for dusting


Directions:
  • In a large bowl mix the flours with the sunflower seeds, wheat germ and salt. Add the walnuts and raisins and mix again.
  • In a small bowl, using a spoon, mix the yeast, honey and warm water until well incorporated.   
  • Add the yeast mixture to the flour and knead by hand. When a dough has formed turn onto a surface sprinkled with bread flour and start kneading. 
  • Add a little extra water if needed to produce a soft but not too sticky dough, or add a little flour if the dough is too sticky. Continue kneading until the dough is smooth and springs back when pressed with a finger.
  • Place in a large bowl, brush the top with a little oil and cover the bowl with a clean kitchen towel.  
  • Leave in a warm place and let rise until the dough has almost doubled in size. For me, it took 4 hours. It was a very cold day, with the temperature around 20°F. The kitchen was reasonably warm, but I think the low outside temperature had an impact on the time it took for the dough to rise. 
  • Once the dough has risen, lightly dust your kneading surface with bread flour and knead again, pressing down on the bubbles created in the dough during the rising. 
  • Preheat the oven to 325°F/150°C.
  • Shape into loaves (two or three loaves, you decide), and lay on a baking sheet that has been sprinkled with a little bread flour or cornmeal. Sprinkle the loaves with some flour and score them. Cover and let rise for about an hour.
  • Place the tray on the middle shelf of the oven, spray the interior of the oven with a quick spritz of water (or place a small ovenproof dish filled with water on the lowest rack of the oven).  
  • Close the oven door and immediately raise the temperature to 350°F/180°C.
  • Bake for 30–35 minutes or until crisp and dark golden in colour. 

Tuesday, 1 May 2012

Olive Oil and Rosemary Bread


Incredibly easy to make, great tasting, a classic bread that's crunchy on the outside, soft in the middle and delectably flavoured with delicious Mediterranean ingredients such as olive oil and rosemary! When this bread is baking it exudes a fantastic aroma!!!

My olive oil and rosemary bread rises quickly and bakes in about 30 minutes. It's an enriched bread, a type of bread whose dough contains fat. In this case, the fat, in the form of 5 tablespoons of olive oil, is a good type of fat: 70% of olive oil is comprised of monounsaturated fats, and evidence shows that monounsaturated fats in the diet reduce the risk of coronary heart disease. In addition to its health benefits, olive oil makes the bread taste better, keep better, and stay softer longer. 

Check out the recipe, and then bake some for yourself. Try it and you'll love it!


Two oval loaves of olive oil and rosemary bread. In this rendition, omitted the whole wheat flour and instead used three cups of bread flour.
Ingredients:
  • 2 tablespoons active dry yeast
  • 2 tablespoons bread flour 
  • 1/4 cup lukewarm water 
  • 3/4 cup water 
  • 5 tablespoons extra-virgin olive oil, plus more for the bowl and to oil the top of the loaves
  • 2 tablespoons honey
  • 1 teaspoon salt 
  • 1/4 teaspoon freshly ground black pepper
  • 3 tablespoons finely chopped rosemary
  • 1 cup whole wheat flour  
  • 2 cups bread flour plus a little extra for dusting the work surface and the loaf (or loaves).
The dough can be formed into two smaller loaves of one larger one. 
Directions:
  • In a measuring cup stir together the honey and the warm water. Mix well. 
  • Add the yeast, mix, then add the two tablespoons of flour. Mix again and let stand for about 15 minutes until the mixture starts to bubble and rise.
  • Meanwhile, into the bowl of an electric mixer fitted with the dough hook add the rest of the water (3/4 cup), the olive oil, the salt, the chopped rosemary, and the pepper.
  • Add the yeast mixture, mix with a spatula and begin stirring on the low setting. 
  • Add the bread flour slowly and continue to mix on low speed until the dough comes together. Use a rubber spatula to move the dough closer to the dough hook. 
  • Raise the speed to medium and mix until the dough is smooth and has pulled away from the sides of the bowl. 
  • Lightly dust a surface with flour and place the dough on top. The dough should be soft and really pliable.  Roll it in the flour and shape it into a ball.
  • Grease a large bowl with olive oil and place the dough ball inside. Cover the bowl with plastic wrap and then cover it with a towel. Let the dough rise in a warm, draft-free spot until doubled in bulk, about one and a half-hour.
  • Press down on the dough to release the gas created by the yeast. Let it rest, covered, for 15 minutes. Allowing it to rest will make the dough more pliable. Turn it out onto a lightly floured surface, and if you'd like to make two loaves, divide it in half.
  • Roll into a loaf (or loaves) and transfer to a baking sheet covered with parchment paper. 
  • Cover with plastic wrap, place in a warm, draft-free spot and let rise for forty-five minutes.  
  • Preheat the oven to 400°F. 
  • Score the dough, brush it with olive oil and dust with a little flour. 
The scoring of bread can be an art form. Some bakers will use a particular scoring style as their personal signature. You can see by this picture that I made a "scoring error." Do use a sharp knife, or a sharp blade, or a sharp pair of kitchen scissors. Unfortunately, on this day, my kitchen shears were dull ... 
  • You could decorate the top of the dough with rosemary, however, the rosemary will burn in the oven. You may choose to decorate the bread once it has finished baking.
  • Bake until golden, about 30 minutes. Adjust the baking time depending on whether you are baking one large loaf or two smaller ones. 
  • Let cool on a wire rack before slicing. No matter how incredibly wonderful its aroma, try to resist the urge of cutting into the bread right away. It will slice better after it has cooled. 

Thursday, 1 March 2012

ONE LAGANA, TWO LAGANES (λαγάνα, λαγάνες): A Greek Bread for Lent


Every year, on Clean Monday, comes the time to make laganes (that's the plural form of the word lagana). Laganes are a type of crunchy, semi leavened bread that's eaten by Greeks only once a year, on Clean Monday. But what does "Clean Monday" mean?


Let's set up the scene:  Apokriés, Αποκριές (the word means "saying goodbye to meat"), is the name for the Greek Mardi Gras (Carnival). It's a time of revelry, eating, dancing, drinking and masquerading. Pranksters rule. Carnival has its roots in pagan antiquity when it was a celebration of spring and rebirth. The early Christian church incorporated Carnival into its calendar, therefore, two millennia later it's still one big, huge celebration, lasting for almost one week and ending late into the night on Cheese Sunday. Yes, I said Cheese Sunday. No, there are no contests to see who can cut the most cheese (forgive me), although who knows, now that I have mentioned it, it may become a trend. Cheese Sunday is so named because the custom is to eat cheese and dairy products as a final treat prior to the beginning of Lent.  


As the next day dawns, it's time to greet Clean Monday, a day of fasting. After all that partying, a day of fasting is sorely needed. A nice long bath too, so that one is really clean on Clean Monday. However, bathing is not the raison d'etre for Clean Monday. The day ushers the Greek Orthodox Great Lent, which lasts about 40 days. For those who observe it, Lent is a period of fasting, reflecting, and repenting. It ends on the movable feast that is Easter Sunday. Therefore, Clean Monday is so named because it's a day to cleanse the soul. In Greece, it's a public holiday. The weather is still nippy and windy, and since people have off from work, they venture out to parks and to the countryside. It's customary to bring along a kite and see how far up high the wind will carry it along. It's fun to look up and see a sky dotted with colorful kites. What's on the dinner table? Well, Greek fasting is a very serious business. During a fast, the Orthodox church forbids eating meat, dairy or eggs. Basically, one has to become a vegan during religious fasts. However, on Clean Monday, the eating of shellfish is allowed. One popular dish to eat is mussels with rice. Another eating tradition is the lagana, a bread which contains only a small amount of yeast. 
 
Laganes are eaten once and only once a year, on this day, and are kind of synonymous with Clean Monday. People line up at bakeries early in the morning to buy them, hangover or no hangover left over from "Cheese" Sunday. By mid-afternoon, the laganes are sold out and the bakery shelves are empty. Here in the US, we have to make due by baking them at home, a job which is really not that hard. The result is so worth it! This was my first try at baking laganes and they came out great!!! Even my mother loved them, and she's very hard to please. She said they were better than hers, and now she wants my recipe. Well, mother, I got the recipe out of a cookbook that you gave me as a gift all those years ago. Remember? That large volume with the beautiful pictures I asked you to buy for me in Greece? Here's the recipe: 


Ingredients:

1 tablespoon yeast
1 cup warm water
4 cups all-purpose flour, plus more flour for dusting
1/2 cup of good vegetable oil
2 teaspoons sugar plus a pinch of sugar
1 teaspoon of salt
3 tablespoons sesame seeds
olive oil for brushing the loaves

Decorate by pressing your fingertips into the dough so that dots are formed. Push hard to make deep indentations that won’t disappear as the laganes bake. Prior to baking, brush the tops of the loaves with olive oil and sprinkle with sesame seeds. 

Directions:

  • Sprinkle the yeast into the warm water and add the pinch of sugar. Leave it for about 20 to 30 minutes until the yeast comes alive and begins to foam.
  • Into a large bowl sift the flour with the salt and the two teaspoons of sugar.
  • Make a well in the centre of the flour and pour in the oil plus the water with the yeast. Mix with your hands to incorporate, and start creating the dough.  If it’s too dry you will need to add a little more water.
  • Move the dough onto a floured surface in order to begin kneading it. Keep kneading until it’s soft and no longer sticky; at that point, it's ready to be formed into loaves. 
  • The loaves can be round or oblong in shape, but they have to be flat, about ½ an inch high. Place them on baking sheets and cover them with clean kitchen towels. In about an hour they should double in size. If not, let them sit a while longer. The leavening process depends a lot on the temperature of the room.  
  • Decorate the loaves by pressing the tips of your fingers into them so that dots are formed. Push hard so as to make deep indentations that won’t disappear as the laganes bake.  Brush the tops of the loaves with olive oil and sprinkle with sesame seeds. 
  • Bake in a preheated 375ºF/190ºC oven for about 35 minutes, until they are golden. Halfway through baking rotate the pans, and if you like, brush a little more oil on the tops of the loaves.  
  • The laganes will have that unbelievable, indescribable freshly baked bread aroma. Isn't irresistible? Eat them the same day while they are fresh. They won't taste as good the next day. If you have some left over, what you can do is freeze them. They will last in the freezer for a good two months.

Wednesday, 30 November 2011

CORNBREAD TURKEYS FOR THANKSGIVING!!!


Cute.  That's the word for it.  Really cute.  Such a jolly thing to have at the Thanksgiving table!  It's cornbread baked inside a turkey-shaped mould. One corny turkey! I found this recipe in a Thanksgiving issue of Martha Stewart's magazine, and since I am too, too corny myself, I had to make it. First off I needed to buy a mould. I had no idea which store to visit that would still be selling one, considering we were really close to Thanksgiving. I thought of checking Amazon.com, and there it was! Amazon had the exact mould I needed! I ordered it and it arrived in three days, on the Tuesday before Thanksgiving.  

Here is a link to the pan I ordered: Nordic Ware 3D Turkey Cake Pan


It's a sturdy, heavy pan, no problem to deal with, and the cornbread did not stick to it at all. When the turkeys were made, I was able to easily stand both halves on their own, and they stayed that way, decorating the buffet table until the time came to eat them. 

Cute, very decorative, and very easy to make. Martha Stewart's recipe is wonderful! This is the best cornbread, with actual corns kernels in it, with chopped sweet peppers, buttermilk and cheddar cheese and thankfully, with very little sugar; I love the sweetness of corn muffins but dislike sweet cornbread. Here's a prerfect cornbread:

Ingredients:

Vegetable oil cooking spray
1 1/4 sticks unsalted butter
2 cups corn kernels
2 shallots minced
1 red sweet Italian pepper, minced 
1 cup plus 2 tablespoons all-purpose flour
2 1/4 cups yellow cornmeal 
1 teaspoon salt 
3/4 teaspoon black pepper
3 tablespoons sugar
1 tablespoon plus 1 1/2 teaspoons baking powder
1 teaspoon baking soda
3 large eggs
2 1/4 cups buttermilk, well shaken
1 1/2 cups grated cheddar cheese

Directions:

Preheat the oven to 350.  Coat the pans with cooking spray.  Melt one stick of butter and let cool.

Melt the remaining 2 tablespoons of butter in a skillet.  Cook the corn, shallots and peppers, stirring occasionally, until soft, about 6 minutes.

Whisk together the flour, cornmeal, salt, black pepper, sugar, baking powder, and baking soda in a large bowl.  Make a well in the centre of the mixture and add the eggs. Whisk the eggs into the flour mixture.  

Whisk together the melted butter and buttermilk and then stir it into the flour mixture, along with the corn mixture and the cheddar cheese.  Mix until well combined.

Divide the batter evenly between the prepared pans.  Smooth the tops and place in the oven. Bake for 30 to 35 minutes, rotating halfway through.  Insert a cake tester into the centre and make sure it comes out clean before taking the cornbread turkeys out of the oven.  Serve warm or at room temperature.  

I'll say it again: Cute! And one more thing: Delicious!


Tuesday, 26 July 2011

PANZANELLA, a lovely bread and tomato salad


There are so many ways to make panzanella! Sometimes, in summer, I make a very simple version just by cutting up stale bread into chunks, combining it with a sliced tomato, and mixing it up with some lemon juice and olive oil. If I want to get fancy I top it with a little crumbled feta cheese. Very simple and it hits the spot.   


Panzanella is a summertime bread salad made popular by the Florentines. It's a good way to use up leftover bread, and it's true peasant fare, which means it's really good. In addition to the bread, panzanella includes tomatoes, lots of basil, and sometimes other fresh vegetables. The salad is dressed with olive oil, lemon juice, or vinegar. It's a great choice for dinner on a hot, hot, day. I made some recently when the temperature was hovering around 100 degrees Fahrenheit, and here's how I put it together:


Get a piece of stale bread and cut it into cubes. Sprinkle with olive oil and mix well. Place the bread cubes in a skillet and cook them on the stovetop. Make sure they are cooked on all sides. As soon as the cubes finish cooking add some grated pecorino cheese and mix. Set the bread cubes aside and let them cool. 


In a large bowl toss the following: 1 sliced large tomato, some cherry tomatoes of various colours cut in half,  a few Kalamata olives cut in half, lots of basil leaves coarsely chopped, and a little Italian parsley coarsely chopped. 

Make a dressing by combining 2 tablespoons of lemon juice, 1 tablespoon of white balsamic vinegar, 5 tablespoons of olive oil, some black pepper, a dash of salt, and a pinch of fresh thyme. Pour it over the salad. Add the reserved bread and toss everything well. Top the salad with a small amount of crumbled feta cheese. Chill for about an hour in order to allow the flavours to blend, then serve and enjoy!!! 


Friday, 25 June 2010

KOULOURIA


Koulouria are a very popular street food all over Greece. They are made in commercial bakeries and are sold as a morning or mid-morning snack. By 1:00 pm or so, vendors are sold out. I guess you can say koulouria are a street food with pedigree since there is historical evidence that they were sold in the streets of Constantinople, the capital of the Byzantine Empire, as early as 800 to 900 CE. (They are discussed in an army manual of the 9th century. See my entry about koulouria here). If you are far from Greece and miss the crunchy, sesame taste of koulouria, here is a recipe you can try that will ease your nostalgia.


Ingredients:

3 cups bread flour plus more for dusting
1 cup lukewarm water
2 teaspoons active dry yeast
1 teaspoon salt
3 teaspoons sugar
1/3 cup vegetable oil, plus extra for greasing the bowl and the dough
1 cup sesame seeds (you may need more)
one medium-sized bowl filled with water at room temperature

Directions:
  • Place the yeast, sugar, salt and 1/3 cup of oil in the bowl of your mixer. Add the water and mix everything with a wooden spoon, stirring until all the ingredients are well incorporated.
  • Add one cup of flour, place the dough hook on your mixer and start mixing on low speed. Add the rest of the flour one cup at a time, mixing well after each addition. Keep mixing until you have a smooth dough. You'll know it's ready if it does not adhere to the sides of the bowl as it's being mixed.
  • Remove the dough to a large bowl that has been greased with vegetable oil. Grease the top of the dough ball with vegetable oil, cover the bowl with plastic wrap and then cover it with a kitchen towel.
  • Place it in a spot that is free of drafts and let it rise until doubled in size, about 2 hours.
  • When the dough has doubled in size punch it down, cover it again in the same manner, and let it rise until it's doubled in size once again, about 1 hour.
  • Punch the dough down once more, remove it from the bowl and cut it into chunks of dough that are about one-inch square.
  • Sprinkle a small amount of flour on your working surface and roll each piece of dough into a strip. Line up the strips and sprinkle flour over them until they are lightly covered.
  • Have the following ready: a bowl filled with water, a clean dish towel, and a flat pan filled with the sesame seeds.
  • Dip each strip of dough into the bowl of water and lightly dry it on the towel. Dry it just enough to remove excess liquid. The dough needs to be somewhat wet.
  • While the strip of dough is still wet, drop it in the pan with the sesame seeds and roll it around until it's coated in seeds.
  • Cover all the strips in sesame seeds.
  • Twist the strips into round shapes and pinch the ends together to make rings. Why should koulouria have a round shape? Look at the picture below:

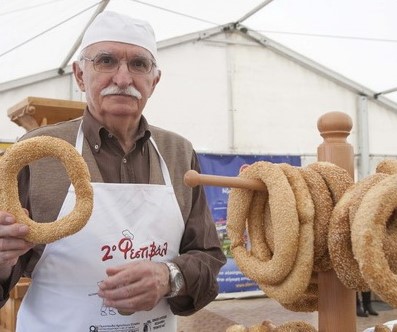
A modern-day vendor. Round-shaped koulouria are easy to stack and easy to carry and sell. If you have a  few wooden dowels you're in business. Merchants have carried them around in this manner for centuries. 

Here's a modern-day display stand, but in the old days, a nice plain dowel did the job just as well!

  • Although koulouria are traditionally made into ring shapes, I like to make both strips and rings. Strips take up less space on the baking sheets, allowing me to fit more on each sheet and finish the job faster. 
  • Place on sheets lined with parchment paper and bake in a preheated 425°F oven for 10 to 15 minutes, until they are golden brown.
  • Koulouria should be crunchy on the outside and soft on the inside. Serve them warm. They taste best if consumed the same day they are made. Unless you are feeding a crowd, you won't be able to eat them all in one day. Store them in an airtight container and enjoy them during the week. They tend to get really crunchy-hard if they are left over, but believe me, they still taste great and can be enjoyed as breadsticks. 

Wednesday, 9 June 2010

KOULOURIA, KOULOURAKIA. WHAT'S IN A NAME?


Koulourakia, a wonderful dessert served here with a cup of coffee.

Koulouria for sale. Grab them while they are still fresh!!!

Is there is a difference between koulouria and koulourakia? The answer is yes, and here are the details:

1.  Koulouria (koulouria is the plural tense and koulouri is the singular tense).

These are somewhat large, bread-like wreaths or rings, smothered in sesame seeds and traditionally served as street food. They are good and crunchy on the outside, soft on the inside, sesame-doughy tasting, and a fantastic treat to eat. They are carbohydrate-rich, very low in fat and make an excellent,  satisfying snack. Greeks eat a very light breakfast, so a crunchy late-morning snack of koulouri holds them over until the mid-day meal, which is the main meal of the day (eaten around one p.m. or at the latest two p.m. - right before the siesta). 

Koulouria are generally mass-produced by specialized bakeries, but there are recipes available for home cooks. (Find my recipe for koulouria here). Bakeries make koulouria at night so that their product can be ready early in the morning for the waiting vendors who will then sell them as snack food.

One of my homemade versions ... 

Vendors cluster around markets and crossroads. Some have stationary street stands, while others are mobile, moving according to demand. Most vendors sell out of koulouria by noon: Koulouria go fast. 

When I was a kid, attending elementary school in Thessaloniki, I used to consider myself lucky if I had the necessary sum of one drachma to buy a koulouri during recess. Sometimes, if our school vendor was in a good mood, she would ask us to cup our palms and she would pour into them the sesame seeds left on the bottom of the trays once the koulouria were sold out. A handful of roasted sesame seeds can make a kid very happy. 


Sesame is used liberally, therefore there are always leftover sesame seeds at the bottom of a tray. This vendor's koulouria are perfection itself and precisely what a commercially made variety should look like! Food heaven in a basket!!!

Etymologically speaking, the word koulouri derives from antiquity. In ancient Greece, the word kollyrio* described a small round-shaped bread made of barley flour. Later on, during Byzantine times, kollyrio evolved into the word kollykio, and that word evolved into the modern day word koulouri. All three mean the same thing: a small roundish bread. (Hold on. We're not done: In some regions, it’s also known as semiti or simit, a term that derives from the Greek word semigdali -- semolina to us. Semigdali or semolina is nothing else but hard or durum wheat, the type of wheat used in bread flour, the type of flour necessary for making koulouria).  

Koulouria were a popular street food in Thessaloniki and Constantinople both during the Byzantine and Ottoman periods. During the early part of the twentieth century, waves of Greek refugees from Constantinople and Asia Minor reintroduced the koulouri to the Greek mainland. 
A considerable number of refugees settled in and around the city of Thessaloniki which is located in northern Greece. Soon, koulouria made and sold by these refugees could be found all over the city, a reason these delicacies, no matter which city they can be found in, are known as "koulouria of Thessaloniki." Their popularity continues to this day.

Homemade koulouri, made smaller than the commercial variety. The smaller size is best for home ovens (photo by Sweet Almond Tree). 

Here is a personal observation: Look at the picture of the koulouri at the top of this paragraph. Do you see the part where the dough has been linked to form a ring? It's clearly visible because it forms an indentation in the koulouri. That is the most delicious part to eat. Since it's been pressed down, it's crunchier, denser, and thinner. It has a taste all its own. As a kid, I used to save this "link" for last, and sometimes I would hide it in my pocket to eat as a special treat later in the day. Eating that little bite was a delight! In the playground, there were two types of kids: those who loved that link and those who didn't. The links were a commodity to be traded or used as ransom in our hide-and-seek games.  Sometimes you could wind up with two or three in your pocket, and then you would be considered rich! 


This mural, dating to the Byzantine era can be found in Thessaloniki. It shows three comrades selling koulouria outside a bakery! 

*The word kollyrio is the etymological root of the word “collyrium,” which is used in the field of ophthalmology. A collyrium was an ancient medicinal preparation: a piece of soft bread was soaked in a remedy and used as an eye compress. Today, a collyrium is a lotion or liquid wash used as a cleanser for the eyes, particularly in diseases of the eye.

I must mention that although this is a beloved and celebrated snack, the life of a koulouri vendor (he is referred to as a koulouras) is a difficult one. Selling anything on the street was and is very hard work. As recently as the mid 1950s, in the still war-impoverished Greece, it wasn't uncommon practice for children to be employed as vendors. 

I'd like to share some photographs (from the Internet):


A modern-day vendor at a festival concession. Today, koulouria are also sold in shops and are available in different varieties such as stuffed with cheeses, olives, vegetables, hams, or ... dear me. chocolates. Myself, I am a sworn purist! Forever! Give me the original version, please.
  
I can't decide if this is a customer or a vendor ... Sometimes, if the vendor has to step away, koulouria will be sold on the self-serve honour system. Take a koulouri and pay for it by dropping your coins into a small receptacle left on the tray.

Thessaloniki 1947

This photograph was not dated but I assume it was taken in the early 1940s. War, poverty, famine and misfortune nearly destroyed Greece during 1940 - 1950. 

A young vendor from Crete, 1900. Too young, but unfortunately, such was and is life.
Notice the traditional Cretan breeches, a style made popular during the 14th and 15th centuries when Cretan men worked on Venetian ships. Versions of these breeches remain part of the traditional Cretan costume. 

Let's now discuss koulourakia (the word means small koulouria):

2.  Koulourakia  

Koulourakia are small, buttery, desert-type cookies. Historically, they were placed front and center on the buffet table during holidays and at times of celebration. Today they can be eaten at any time. Koulourakia can have various shapes such as twists, circles, serpentines, you name it. There is a shape meant to resemble a ship or boat, but in my opinion, the resemblance depends on an active imagination. Often, the shape is influenced by the region where the koulourakia are made and the preference or stamina of the person making them. 

The basic recipe for koulourakia contains flour, sugar, butter, and aromatics. The texture is crumbly, crunchy but not hard, and the taste is buttery with hints of the flavourings used. There are several flavourings to choose from: orange, lemon, brandy, ouzo, vanilla, etc. Koulourakia are brushed with egg wash before baking, and it's traditional but not necessary to top each one with a few sesame seeds. When koulourakia contain spirits, they are called koulourakia methysmena, which means drunk koulourakia. In some regions of Greece, perhaps for religious or dietary reasons, spirits are not used for flavouring. Anise can be substituted, to give the hint of the ouzo taste. After all, ouzo, the famous and omnipresent Greek apéritif, is flavoured with anise. 

You can find one of my recipes for koulourakia by clicking here. I should mention it was my mother's recipe, and the koulourakia pictured at the top of this post, the ones next to the coffee, were made by both of us: she made the dough, I shaped them. She used to say the recipe was the best one for koulourakia she had ever tried ... given to her by a dear girlfriend.  

Koulourakia before going into the oven.

Note: Some of the information on street food is based on personal observation. A certain amount, particularly that of the etymological origins of the word "koulouri," is taken from the book "Street Foods, World Review of Nutrition and Dietetics, Volume 86" edited by Artemis P. Simopoulos and Ramesh V. Bhat.

Scattered among my own  photographs are some borrowed from "Parallaxi," a Greek online magazine.