Showing posts with label Feta Cheese. Show all posts

Sunday, 4 August 2013

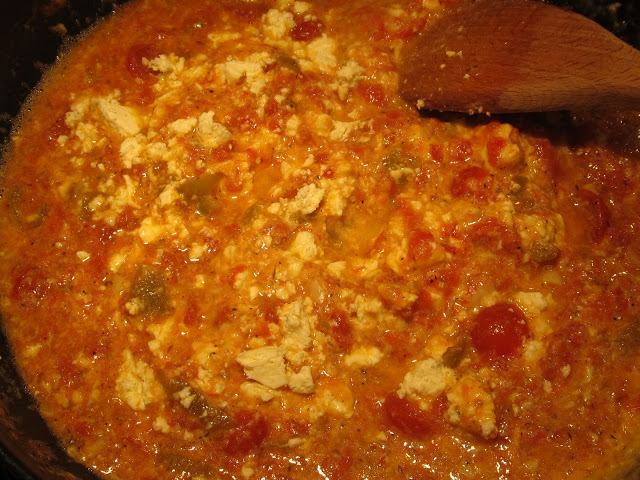
STRAPATSADA FLAVORED WITH PEPPERS


A plate of strapatsada is one of my favourite Greek meals. It tastes like summer! It's because of the tomatoes, I think. When they ripen and turn bright red they bring that special taste to this dish. The salty feta cools things off, and the eggs bind all the ingredients together. 

There are about as many variations of strapatsada as there are regions in Greece. In the north, peppers are added. In some islands, feta cheese doesn't even make an appearance. The most popular version is the one with eggs, feta and tomatoes, and that's the one I prefer. I don't grow peppers, but once in a while friends bring me peppers from their garden. That's when I like to throw this version of strapatsada together. Just a couple of peppers, one mildly hot and tangy, the other sweet and tender, just two peppers will add an appealingly piquant note to strapatsada. Try it. Use the freshest ingredients you can get, and you'll have a delicious, nutritious and economical dish! 


INGREDIENTS:

6 large fresh tomatoes, peeled, seeded and chopped
2 cloves of garlic, minced
1 long green hot pepper, seeded and sliced into thin rings
1 sweet Italian frying pepper, seeded, sliced in half lengthwise and chopped
4 or 5 eggs, beaten
salt and pepper to taste
dried oregano
feta cheese, crumbled
2 tablespoons milk 
2 tablespoons olive oil


DIRECTIONS: 

In a skillet, heat the olive oil and add five of the tomatoes.  Season with salt and pepper, add the garlic, oregano and peppers, stir to combine and cook over medium heat until the liquid from the tomatoes has evaporated. Add the reserved tomato and mix.
 

Add the milk to the beaten eggs then pour the egg mixture onto the tomatoes.  Cook while constantly stirring the mixture in a folding motion. The eggs should become incorporated with the tomatoes but they should not get overcooked or burned. 

 Freshness here is key: get the best organic eggs!


 Just as the eggs are about to finish cooking, add the feta cheese and continue cooking and folding for about another minute or so.  


Plate the strapatsada and serve it hot with toasted bread as an accompaniment.


Monday, 29 July 2013

WHEN YOU'RE EATING TO LIVE TRY THE POLENTA: REFLECTIONS ON READING MFK FISHER'S "HOW TO COOK A WOLF"

“By all means marry; if you get a good wife, you'll be happy. If you get a bad one, you'll become a philosopher.” That’s what Socrates said, and it’s well known that he had an unhappy marriage. Therefore, he became a philosopher. I imagine his wife was a horrible cook because soon after Socrates became a philosopher he coined this phrase: “Eat to live, do not live to eat.” I think what Socrates meant was not to be a glutton or engage in debauchery. Keep to the middle of the road, don’t go overboard. 

I like to remember the “eat to live, do not live to eat” quote every time I go to the supermarket. Everything there is strategically arranged to tempt the buyer! That’s what you call marketing (pun intended). Before you know it, you’ve bought a whole host of things that you have no use for. That’s excess, and that's not a good thing. Socrates would be disappointed as would be MFK Fisher; MFK eschewed excess. Of course, when times are hard, excess is difficult. When the "wolf is at the door," meaning when one is faced with difficult times, ingenuity must come into play. 

MFK Fisher’s book “How to Cook a Wolf,” written during World War II, is devoted to giving ideas on how to eat well during hard times. The book's premise is how to master the proverbial wolf rather than let him threaten. Keep calm, be ingenious, and persevere. That's "How to Cook a Wolf!" Clever title, enjoyable book. This was my introduction to MFK Fisher (Thank you, Simona). Fisher was a bohemian, a cook, a gourmet, a journalist and a pioneering food essayist. In her book, she discusses food shortages, rationing and other difficulties faced in the US during the World War II.  

Her observations about food contradicted what was commonly believed at the time, but she was right on target: Eat lots of fresh vegetables she said. Have a nice, big salad. Don't forget about seafood. If you have wilted vegetables, they're perfect for soup. Make sure your eggs are fresh, even if you have to pay a little more. It will be worth it in the end. Make your food stretch by adding rice or potatoes to it. Save on gas: your oven can accommodate more than one dish at a time. Add the dessert in there along with the main course ... Her ideas about fresh food and food economy are conveyed in a clever, appealing manner. One of these days I may have to try baking her tomato soup cake. Tomato soup? In cake? It's been heard of. It was a pretty common Depression-era and wartime addition to spice cake. Tomato soup was the "mystery ingredient" which allowed cooks to economise on the use of oil/butter, milk, eggs, and sugar. MFK doesn't tell us, but tomato soup makes a cake moister and sweeter. Of course, you know ... don't add it when making a genoise ... 


 MFK Fisher's "How to Cook a Wolf" is the entry for COOK THE BOOKS CLUB,  this round hosted by Simona from BRICIOLE.  Read the book, cook what inspires you from the reading, then blog about it.  That's the objective! 

I would not have been able to praise Fisher had I not decided to write what follows, some of my thoughts concerning food shortages in wartime Europe. Once I had those thoughts on paper, I felt a sense of relief and was able to go back and reread "How to Cook a Wolf" with enjoyment. It was Fisher's chapter on how to manage during blackouts that brought back memories of stories heard from relatives concerning how they dealt with blackouts. And with curfews, too. And with fear. During World War II, my family lived in Greece, which was under nazi occupation. Things there were just a tad more serious than in the US (of course, if not for US soldiers, who knows what Europe would look like today). 

In her book, Fisher explained such things as how to cook a tough cut of meat. During the war, my family felt they were rich if they could eat bean soup for dinner. My grandfather was imprisoned and nearly shot because he bought meat from someone who butchered a cow without having gotten permission from the authorities. Needless to say, the man who butchered the cow (his own cow), was shot. Shot dead. Knowing all these stories, plus lots more, I initially reacted to Fisher’s book with commingled feelings: with interest, because this is a charming book, but also with disdain because I knew and sympathised with people who had it a lot worse than Fisher's intended readers. In wartime America, food was plentiful albeit rationed. In Greece, food was a luxury and near starvation was the norm. Tell me MFK, how do you make a nice meal out of just a handful of raisins? I really don't think MFK, knowledgeable as she was, would have had an answer.

But if during World War II my relatives considered beans to be a rich meal, polenta was their staple meal. They would eat polenta nearly every day. My grandfather was the polenta guru of the clan, cooking it over an open fire in the yard, and stirring it all the long time it needed to be stirred. Then he would take it to my grandmother who poured it onto a platter and flavoured it either with petimezi (a syrup made from grapes), or with feta cheese: Polenta made either sweet or savoury. My mother once told me that she loved the sweetened petimezi polenta. I believed her 100 percent because mom was known for her sweet tooth and for the desserts she made! 

Fisher has a very nice recipe for polenta in the chapter "How to Pray for Peace," and she aptly describes the starchy cornmeal concoction that is polenta as "a sturdy... mixture, the kind that has survived centuries of loving obedience from hungry, simple peoples."  
   
Strapatsada

I would like to dedicate this post to the persevering spirit of my relatives and the like-minded spirit of all war-torn families. For this entry of Cook the Books Club, I cooked two dishes that I heard lots about from my mother: Strapatsada, a dish made with tomatoes, eggs and feta cheese, definitely a luxury food during the war. Strapatsada is reminiscent of Fisher's recipe "eggs in purgatory," known across the pond that is the Atlantic Ocean as "uova in Purgatorio." 

I also made polenta, which was my family's wartime staple. After the war, polenta all but disappeared from Greek dinner tables, but strapatsada is still a favourite.

Here is a pertinent war-time story: my cousin Socrates was born during World War II. I am very fond of Socrates, he is a righteous dude. He is named after Socrates, the philosopher. This is how that happened:

Soon after he was born, the yet unnamed baby Socrates was taken to church, ready and willing to be christened. It’s a Greek tradition to name the newborn after his or her grandparents. And there was the problem. The baby's mother wanted her son to have her father’s name, and the baby's father wanted his son to have his father’s name. For days, the back and forth had been: 

"It's going to be Nicholas!"
"No, it's going to be Constantine!"

Husband and wife could not agree (sound familiar)? They arrived at church still arguing about names. Now the godmother of the baby was to be my mother, who at the time was about 12 years old. Godparents in Greece have special powers. They can execute a coup, and give the baby a name of their own choosing. My grandfather saw that the argument between the baby’s parents was not going to be settled anytime soon, so he approached my mother. 

“Tell the priest to name the baby Socrates,” he whispered in her ear. 

As a compromise, grandfather decided to have the baby named after one of the famous ancient Greeks. You know, Socrates, the philosopher who said “eat to live, do not live to eat.” So the ceremony started, and when the priest asked:

“What is this servant of God going to be named?” my mother belted out: 

“Socrates!” 

So Socrates it was, and Socrates it is. After every christening, there always follows a big celebratory dinner. That’s the point of this story: what do you serve when there is nothing much to be had? Vegetables! My grandparents grew tomatoes in their yard. Plus they had some chickens they kept for the eggs, plus they always managed to get feta cheese. (How they got feta cheese during the war is a very long story. I can email you the details). With those ingredients on hand, they made strapatsada. Lots and lots of strapatsada. And the sweet kind of polenta. And a salad too. A really big salad. Plus they had homemade noodles flavored with olive oil and more feta cheese. Then, there was fruit for dessert. My mother always spoke about that dinner. In the midst of deprivation such a feast made a big impression. I think MFK Fisher would have been pleased with the results. 

Thank you for reading my post, but I am not finished. Reader, hang on. I have one more thing to add: 

Socrates, I love you! 


Saturday, 15 June 2013

WHITE BEAN DIP WITH FETA CHEESE AND OLIVES


This is a great tasting dip, folks!  Its taste is amplified because it contains roasted a roasted shallot, some roasted garlic, plus the juice of a grilled lemon. 

Pulse a few beans in the food processor along with a host of flavorful Mediterranean ingredients and you get an extremely tasty, creamy and healthy dip! 
  • Healthy because the dip is low in fat compared to most other dips out there. 
  • Healthy because it's high in protein, calcium and fibre.  
  • Tasty!!!  
  • Spread the dip on toasted pita slices and you have an irresistible treat!  A really, really delicious and healthy treat!

This recipe is fast to make.  It took me about 20 minutes, and that included cleanup. Who doesn't love the dishwasher??? 

***Here is a tip about feta cheese and olives: 
As these are salty ingredients we Greeks always rinse some of the brine from them.
For the feta cheese: just place the cheese into a bowl and pour water over it. Change the water once or twice, drain, and you're done. The feta will be significantly less salty. If for dietary reasons you want to remove lots of salt from the feta cheese, you can let it soak in water. Experiment with how much time is appropriate for your taste and dietary needs. 
For the olives: they usually also need a good rinsing. Once the job is done, place them into a container and pour a combination of canola and olive oil over them. (Olive oil congeals in the refrigerator, so it must be mixed with another type of oil to keep it from solidifying). The oil should come almost but not quite halfway up the container. Cover, shake gently to coat all the olives and store in the refrigerator. This can be done with just about any type of olives except the sun-dried variety. Those don't get rinsed because they will absorb water and will no longer be sundried.

How to make white bean dip with feta cheese and olives:

Ingredients:
2 (15-ounce) cans white beans such as Great Northern  
5 cloves of garlic, roasted and mashed
1 shallot, roasted and chopped
1/2 cup extra virgin olive oil
black pepper to taste
1/2 teaspoon dried oregano
2 tablespoons chopped flat-leaf parsley 
3 tablespoons fresh rosemary leaves, save a few for garnish
the juice of one grilled lemon
1/2 cup pitted Kalamata olives
8 ounces feta cheese
1/2 cup chopped walnuts

Directions:

  • Cut the lemon in half, brush each half with olive oil and grill. This can be done on the stovetop. 
  • Drain and rinse the beans. Place them into the food processor and add the juice from the grilled lemon.   
  • Add the roasted garlic, the roasted shallot, olive oil, feta cheese, rosemary, oregano, parsley and black pepper—no need to add salt because the feta cheese and olives contain enough of it.
  • Blend in the food processor until all the ingredients are smooth and creamy.
  • Add the olives and walnuts. Pulse a few times until they're coarsely chopped. Small pieces of each should be visible in the dip.
  • Place into a bowl and refrigerate for 4 to 5 hours. The dip is better if it gets a chance to rest. And really, aren't we all better when we get a chance to rest? 

Take the dip out of the refrigerator and place it into a serving bowl. Drizzle some extra virgin olive oil on top of the dip. Decorate with a few rosemary leaves, and serve with your favourite crackers.  

I hope you love this recipe as much as I do!


Friday, 22 March 2013

PASTA PUTTANESCA with SHRIMP and FETA

I got the idea to make pasta puttanesca with shrimp and feta cheese when I was reading Andrea Camilleri's novel "The shape of water," featuring the character of Inspector Montalbano. I was reading the book for my participation in Cook The Books Club, and I had to think of something nice to make that reminded me of the book. The shrimp, the briny sauce, and the briny feta cheese bring to mind the seaside where inspector Montalbano likes to stroll. 

This is an enjoyable dish and very easy prepare. I love how Greek and Italian ingredients are combined here: strong Mediterranean roots! This dish depends on freshness, therefore, working quickly when preparing it is a must. I had the idea of garnishing the pasta with some fresh grape tomatoes which are very abundant at the market this time of year. They are imported all the way from Mexico and are very tasty. 


Linus happens to love pasta and today he is waiting patiently for his share.
Ingredients:


olive oil
1/2 pound shrimp, peeled and deveined
1/2 pound linguini
2 teaspoons fresh thyme leaves
1 teaspoon dried oregano
2 tablespoons crumbled feta cheese, plus a little more for garnish. 
two or three sun-dried tomatoes, chopped
3 Roma tomatoes cut into chunks (seeds and skin removed)
some grape tomatoes cut in half, to be used for garnish
4 anchovy fillets
2 tablespoons capers, rinsed
1 teaspoon red pepper seeds, or use more if you prefer
4 cloves of garlic, chopped
10 pitted Kalamata olives, sliced in half
¼ cup fresh Italian parsley, chopped

Directions:

  • First, prepare the pasta and shrimp: 
  • Fill a large pot with salted water and bring it to a boil. Add the linguini and cook according to package directions. 
  • Drain the pasta and place it in a large bowl. Sprinkle some olive oil on the pasta, and mix.
  • Meanwhile, in a large skillet heat 3 tablespoons olive oil. 
  • Add 2 cloves of garlic and sauté for one minute. 
  • Add the shrimp and thyme and cook for about 3 minutes, until the shrimp have turned pink. 
  • Remove from the heat, add the feta cheese and season with freshly ground black pepper. 
  • Add the shrimp mixture to the pasta.
  • Add some parsley and mix well. Cover and set aside.
  • Now make the puttanesca sauce:
  • In a pan heat some olive oil and add the rest of the garlic along with the anchovies, red pepper seeds, and capers. Cook for about one minute, stirring. 
  • Add the olives, the oregano, the Roma tomatoes and the sun-dried tomatoes. 
  • Cook for about 10 to 15 minutes.
  • Add the sauce to the pasta and shrimp and mix. 
  • Before serving garnish with the grape tomatoes and the rest of the parsley and feta cheese.

Saturday, 22 December 2012

SALTY KOULOURAKIA / BÂTON SALÉ / AΛΜΥΡΆ ΚΟΥΛΟΥΡΆΚΙΑ AND A BEER


These little treats are just like potato chips, in that you can't eat just one. You have to go back and get another and another. It's just a guilty pleasure. They are salty, cheesy, buttery, they melt in your mouth, and they are irresistible! The dough is a little crunchy on the outside and a lot flaky on the inside!!! 

If you are familiar with koulourakia, you know that they are a sweet buttery Greek cookie. Here is a different version of koulourakia: these babies are not sweet ... they are savoury, or as Greeks call them, they are "salty koulourakia." They are also referred to as "bâton salé," which in French means "salty sticks." I don't know why they have two names but they can be found in patisserie shops all over Greece, and they are a very popular snack.

Bâton Salé or Salty Koulourakia  ... Presenting this wonderful, addictive, savoury cookie!!!

This recipe was given to me by my aunt Sophia, who told me that she got it from the owner of a patisserie shop. It's supposed to be a top-secret recipe. (Actually, it was top-secret up until the time I published it). I don't know what methods my aunt employed to get it, and I don't want to find out, either. Suffice it to say that it's a great recipe!  

Salty koulourakia go well with drinks, especially with beer. If you want to drink that Heineken so you can forget the one you love who doesn' love you back ... go ahead, drink the beer, you're probably not in the mood for a snack. On the other hand, if a party is happening where beer will be served, make salty koulourakia, I recommend them! These guys are also good with tea. Somehow, I don't like them with coffee. 

Mix by hand, no need to use electric appliances. This recipe is incredibly easy and quick to make. To prepare it requires only one bowl, a whisk, a measuring spoon, and a measuring cup! The full recipe will yield 70 pieces but it can be cut in half. 


Ingredients:

butter: use half of a pound which is 
           equivalent to 8-ounces, or    
           2 sticks, or one cup; for the 
           metrically inclined, the butter
           equivalent is 230 grams.         
1 cup good vegetable oil 
1 cup milk
2 eggs
1 teaspoon black pepper
3 teaspoons baking powder
1/2 cup ground Pecorino Romano cheese
2 tablespoons feta cheese, finely crumbled
about 4 cups of flour
1 egg beaten with a tablespoon of milk, a few dashes of poppy seeds and a tablespoon of Pecorino Romano cheese: this will be used as egg wash
Additional toppings: sprinkle slivered almonds or sesame seeds on top of the egg wash


Directions:

Melt the butter, let it cool and then whisk it with the oil until well blended.  Add the eggs and continue whisking.
 
Add the milk, the black pepper, and the cheeses, and continue beating.

Sift the flour with the baking powder.  Add it gradually to the butter mixture, mixing between each addition. 

Turn the dough onto a board and knead, adding more flour if necessary, not so much that the dough gets tough. The dough should be soft and pliable.

Cut the dough into pieces of about 1 inch in diameter.
  
Shape into rods or circles.
Place on parchment-lined baking sheets, and brush with the egg wash mixture.

Use some toppings if desired.
  
Bake in a preheated 350º F/180º C oven until golden in colour (about 25 to
30 minutes). 

give them different shapes ...


top them with almonds, have them with tea ...
 
Pictured above is a previous version that had been baked. Notice how I had given them different shapes. Just have fun making them and shaping them! They're very enjoyable! 


Sunday, 17 June 2012

STRAWBERRY and FETA SALAD with HONEY-LEMON DRESSING


Strawberries are in season now, and I'm talking about the small, sweet, locally grown variety. There are lots of ways to use them: how about some strawberry lemonade? How about fruit salad with strawberries as the star ingredient? Or, how about just popping them in your mouth, one by one? Then there is another way in which to serve luscious sweet strawberries, and that is to scatter them on top of a salad. With feta cheese. There is something about feta that truly compliments summer fruit! If you're wondering, yes, salad dressing, if it's the right type, does go well with strawberries. The dressing for this salad includes balsamic vinegar, lemon, honey, and mint: It's a perfect sweet-tangy blend! Greens, avocado, feta, strawberries, and toasted nuts. Just five ingredients and the dressing. Simple and perfectly delicious! 


Make the dressing: 

1/4 cup olive oil
1 Tablespoon  honey
2 Tablespoons lemon juice
1 teaspoon grated lemon zest
1 teaspoon balsamic vinegar
1/2 teaspoon chopped mint
1/2 teaspoon thyme leaves
salt and pepper to taste


  • In a small bowl whisk the lemon juice with the lemon zest, honey, balsamic vinegar, mint and thyme. 
  • Whisk in the olive oil.
  • Season with salt and pepper. 


For the salad: 

feta cheese, crumbled
blue cheese, crumled
strawberries, sliced in half
avocado, sliced
spinach leaves
sliced almonds, toasted


  • Arrange the greens on a serving platter and mix in the almonds.
  • Top with strawberries and cheese, then sprinkle more sliced almonds on top and drizzle with the dressing. 


Friday, 24 September 2010

GREEK SALAD or HORIATIKI SALATA with ROASTED CHICKPEAS


Eating a Greek salad is one of the best parts of summer! Simple to make and so very delicious. Just about everyone has their favourite version of Greek salad, and below you'll find the recipe for mine. I make it without lettuce and no, there is absolutely nothing wrong with lettuce! But a traditional Greek salad contains no lettuce chiefly because, unless harvested in a greenhouse or shipped from a colder weather region, lettuces don't grow during the heat of the summer months as do tomatoes and cucumbers. 


This is the rustic, country style version of Greek salad that goes on the table in every Greek household and seaside taverna. The dressing is simply olive oil and lemon, maybe a little vinegar too. There's always some dressing left at the bottom of the bowl and it absorbs the taste of the salad ingredients. In keeping with the rustic nature of this salad, a common practice is to mop up and eat the leftover dressing with pieces of freshly baked bread. This necessitates that one disavows a large measure of savoir-vivre but sometimes, who cares? It's a fun, sharing experience to break bread with one's tablemates in this way. There is even a colloquial term for the morsels dipped in an olive oil dressing: they are called papara ... 

The word "horiatiki" derives from the word "horio," which means village. Horiatiki salata can be translated as rustic style, or country style, or village style salad. Because of its rustic nature, there is no set amount of ingredients to be used. Just make sure the salad looks good! I use the following:


Ingredients:
  • 2 or 3 tomatoes, sliced (sometimes I use both red and yellow tomatoes)
  • 1 cucumber, peeled, sliced lengthwise then cut up into slices crosswise. Remove the seeds! It's preferable to use the English variety of cucumber because it has fewer seeds and tastes the best 
  • 1 green pepper, seeded and sliced (for subtler texture and flavour you can use a sweet Italian frying pepper)
  • 1/2 red onion, peeled and sliced into thin rings
  • a combination of kalamata and oil-cured olives, pits removed
  • feta cheese cut into cubes
  • chopped parsley
  • black pepper
  • a small amount of salt 
  • capers, rinsed
  • dried oregano
  • olive oil
  • a bit of lemon juice
  • if you are a vinegar fan, a bit of vinegar

optional: one small can of chickpeas or some homemade croutons if you have stale bread that needs to be used! A nice touch would be to roast the chickpeas, allow them to cool, then incorporate them into the salad. Same goes for the croutons. Drizzle with olive oil before placing in the oven and roast at 450°F/200°C for about 15 minutes. Keep checking so that they don't burn.

Directions for the salad:
  • Arrange the sliced tomatoes and cucumber on the bottom of a nice sized salad bowl.
  • Top with the peppers and capers. 
  • Add the onion slices, salt if using, black pepper, oregano, parsley, and olive oil.
  • Sprinkle with a bit of lemon juice and the vinegar if using, and mix.
  • Once the above ingredients are mixed, add the feta and olives in a decorative pattern. Top with a bit more olive oil and oregano.
  • If you made the chickpeas or croutons, make sure they have cooled and throw those on there as well!
  • Before the salad is served let it sit in the refrigerator for a while. It will come out tasting refreshing, plus the aromas of the vegetables and olive oil will get a chance to mix together, creating their own unique flavour.

If you try this or any other Greek salad, I hope you really, truly enjoy it!